Module Manager
If you have arrived at this topic from a link without reading the previous topic, then please read Anatomy of a Fixture Type first.
All fixtures needs a minimum of one Module. Some fixtures have more than one. For instance a fixture that has one pan attribute but several tilt attributes (several small heads mounted on same yoke). Or more commonly one module with pan, tilt, zoom, master intensity, and other common functions and then another module for each LED pixel in a wash moving head.
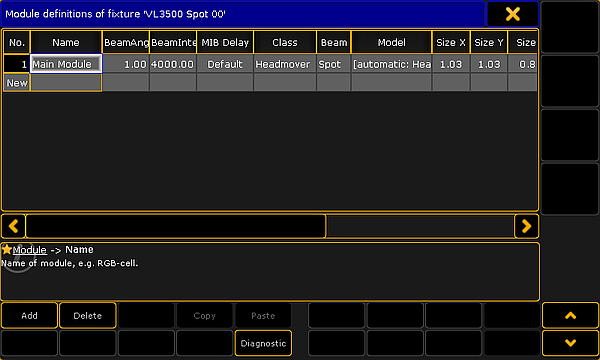
In the Module Manager, it is possible to edit the module information. The manager can be opened from the Fixture Type Editor. It could look like this:

There are buttons at the bottom to add more modules or delete the existing ones. The Diagnostics button opens a pop-up listing errors or warnings for the modules.
The module manager displays the different modules in rows and several columns are used to display and edit the module elements. Here is a short description of the columns:
- No.:
This is an auto generated number for the row. It cannot be edited. - Name:
This is the name of the module. - BeamAngle:
Here it is possible to set a static beam angle. If the fixture has a variable zoom, then it is best to set this value to "1" and defined the physical zoom degrees in the zoom attribute. - BeamIntensity:
Here it is possible to set a lumen intensity. This value is used in MA 3D. - MIB Delay:
The module can have a custom MIB delay value. The "Default" value will use the MIB Delay time defined in the Playback & MIB Timing settings in the Setup. Read more about MIB in the Working with MIB topic. - Class:
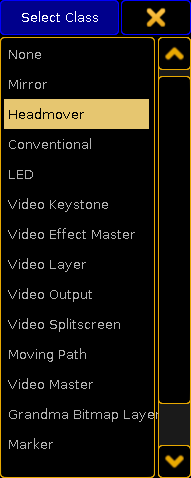
The Class describes the type of module. Editing this cell will open the Select Class pop-up. Please read more below. - Beam:
The Beam option defines how the light beam is visualized in MA 3D. Editing the cell opens the Select Beam pop-up:
Select Beam type
The options are: None, Spot, Wash, Effect, and Fiber. Be aware that the LED class does not display a beam - no matter what is selected in this option. Often it is only the Spot and Wash beam types that are used and visualized correctly in MA 3D. - Model:
The model is the 3D model used in MA 3D. Editing this cell opens the Model pop-up. It list all the different 3D models in the show file. To read more about custom 3D models please read the 3D Modeling and Import topics in the MA 3D manual. - Size X, Size Y, Size Z, Axis X, Axis Y, and Axis Z:
The size and the axis column describe the physical size of the fixture and where the movement axis are for the fixture. Editing one of these cells opens the Body Description pop-up. It looks different depending on the selected Class. Most classes do not have a body description and the cells are locked for editing. - Local:
Setting this cell to On, will make this module be calculated locally. This should be used with great care. It is intended to be used for tracking systems. It might help if there is a small latency in the tracking system to have the Stage Marker fixtures calculated locally instead of distributed in the system. If local calculation is applied to many fixtures then it might have the reverse effect and actually add more latency.
Module Classes
The Class is used to describe the type of fixture. It defines how it is visualized in MA 3D. The Select Class pop-up opens when the cell is edited in the module manager.

This is a show description of the different classes:
- None:
This class does not display any 3D models in MA 3D. - Mirror:
This class is for moving mirror fixtures. The default 3D model type is a classic "scanner" model. - Headmover:
This is a moving head or moving body fixture type. The default 3D model type is a classic "yoke" model. - Conventional:
This is used for non moving fixtures. The default 3D model type is a classic "parcan" model. This might also be a useful class for non-moving LED fixtures where the beam is to be visualized in MA 3D and the Stage window. - LED:
This class is used for non moving LED fixtures. There is no light beam from this class. It is a light emitting surface. The default 3D model type is a "box" model. - Video Keystone:
This class is used by some media servers. There is no 3D model associated with the class. - Video Effect Master:
This class is used by some media servers. There is no 3D model associated with the class. - Video Layer:
This class is used by some media servers. There is no 3D model associated with the class. - Video Output:
This class is used by some media servers. There is no 3D model associated with the class. - Video Splitscreen:
This class is used by some media servers. There is no 3D model associated with the class. - Moving Path:
The moving path class is used by the Moving Path fixtures from MA Lighting. They can be used to move other 3D elements in MA 3D. There is no 3D model associated with the class. - Video Master:
This class is used by some media servers. There is no 3D model associated with the class. - Grandma Bitmap Layer:
This class is used by the Bitmap fixture from MA Lighting. This virtual fixture can be used to apply values to other fixtures - Read more in the Bitmap Fixture section. There is no 3D model associated with the class. - Marker:
This class is used by the Stage Marker fixtures from MA Lighting. These virtual fixtures can be used to move a marker around the 3D space. There is no 3D model associated with the class. - Camera Controller:
This class is used by the Camera Controller fixture from MA Lighting. This virtual fixture can be used to move a camera around the 3D space. There is no 3D model associated with the class. - Preset:
This class is used by the auto generated "Fixture Type" fixtures that appear in the Fixture Sheet and Channel Sheet. It should not be used by other fixtures.

