
Playing back Cues
Cues are played back from the sequence.
Sequences can be played back from two different locations.
They can be assigned to an executor and run from there or they can be played back from the Sequence Pool.
You can always see the actively running playbacks in the Running Playbacks window.
Sequence assigned to an Executor
When a sequence is assigned to an executor, then it can easily be played back. This is the most common way to run the sequence.
There are many commands related to running the cues. The most used ones can be assigned to the keys associated with the executor.
The default for an executor with an sequence is that one of the keys has the "Go" command assigned. Pressing this key will run the cues using the Cue Timing.
If the executor has a fader then the default function for this fader is "Master". A master fader works as an intensity master, meaning that it effects the dimmer values.
A fader can also have the CrossFade function. If a CrossFader is moved from one of the outer positions (top or bottom) towards the other then the movement is used to fade from the current cue to the next. This will disregard any cue timings and simply use the movement of the fader as the time. It is even possible to go backwards. When the fader reaches the other outer position then it becomes the new normal position and moving the fader again will start the manual cross fade to the next cue.
Any command related to playing back the cues can be used with the executor.
For instance if you run the following command:
Then cue number will be played back on executor number 8 on your currently active page - if there is a cue number 4.
Using the command input makes it possible to overwrite the stored cue timing.
If you for instance wanted to run cue number 4 on executor number 8 on executor page 1 using 5 seconds fade you could type the following command:
Using the keys you would need to press the following:
Goto Cue 4 Exec 1 . 8 Time 5 Please
This will overwrite any cue and individual timing and use the time specified in the command.
For details about the executors and the related commands, please read the Executor section. also have a look at the Sequence Mini Executor topic.
Sequence running in the Sequence Pool
It is possible to play the sequence directly from the sequence pool.
Pressing the small Go+ key followed by any of the sequences in the pool will run the first cue in the sequence. Repeating this will continue to run the next cues just as if the same go command was run on an executor. In fact any of the commands regarding playing back cues works in the sequence pool.
For instance if you run the following command:
then cue number 4 will be actively playing back from the sequence pool.
It can be hard to see this in the sequence pool, but the Call Mode can be changed to "Pool Playback". Then the sequence sheet could look like this:
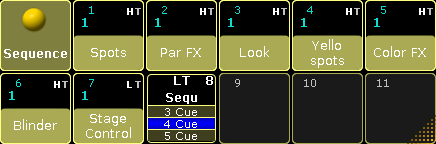
Making it a lot easier to see that sequence number 8 is actually running cue number 4.
If "Direct Action" is active then tapping the pool objects is the same as pressing Go+ followed by the pool object.
Trigger
Each cue has an assigned trigger. This can be seen and edited in the Trig column in the Sequence Executor Sheet.
Some trigger are connected to a time. This can be edited in the Trig Time column - also in the Sequence Executor Sheet.
The Trig defines what actually triggers the execution of the cue. Editing the cell will open the Select Trig pop-up. It looks like this:
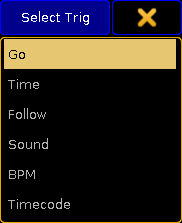
The options here are:
- Go:
This is the factory default. It requires a Go action to active the cue. - Time:
This is a countdown timer that starts the count down when the previous cue is triggered. If you have cue 1 and 2 and cue 2 has a Time trigger set to 2 seconds, then the countdown starts when cue 1 is triggered. The time is set in the Trig Time column. - Follow:
This trigger will activate when the previous cue has completed all fades and delays - including individual times. The Trig Time column can be used to add an additional delay between the completion of the fade in the previous cue and the triggering of the cue. - Sound:
This will trigger the cue using a sound peak as the trigger. It is possible to choose one of 11 different frequency areas in the Trig Time column. - BPM:
This will trigger the cue using the beats in the sound input. This can become useful with several cues being triggered by the BPM (Beats Per Minute). - Timecode:
A cue can have a timecode time as a trigger. The sequence is connected to a Timecode Slot. When the sequence is active and the specified time (in the Trig Time column) is received, then the cue is triggered. Read more about it in the Record a Timecode Show topic.
When a cue is triggered by timecode, then it always Asserts. Read more about assert in the Using Cue Modes topic.
The default trigger can be changed in the Setup -> User -> Defaults -> Sequence Defaults. This is a setting that follows the User Profile.
Priority
When several sequences are affecting the same fixtures then priorities become important. The priority setting is actually an option to the executor.
These options can be opened by pressing the Assign key and then one of the executors keys where there is a sequence you want to change. This opens the Assign Menu. On the right side of the menu there are some buttons. Please press Options button. This is all the options available for a sequence assigned to an executor. These options are discussed in the Executor Options topic.
The top button in the second column sets the priority. Tapping it will open a small select pop-up like this:
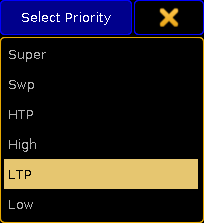
This is the list of possible priorities. This is a short explanation of the priorities:
- Super:
This priority is the LTP priority above any other playbacks and even above the programmer. - Swp (Swap):
Intensity is working as LTP with higher priority than HTP. - HTP (Highest Takes Precedence):
The highest intensity value will be used. Other parameters will use LTP. - High:
High LTP priority - like LTP but a higher priority than normal LTP. - LTP (Latest Takes Precedence):
This is the normal LTP priority. The newest attribute value is prioritized over the the old value. - Low:
Low LTP - This is a lower LTP priority.
Soft LTP
This option is related to how intensities change from one executor to the other.
When it is active then the intensity will fade from the old intensity to the new, when the fixture is "transferred" from one executor to the other.
When it is deactivated, the intensity will snap to the new value, then starting the new (higher priority) executor.