
Looking at the Cue Sequence
If your show has sequences with multiple cues, then it is very useful to be able to see the sequence and see the active cue and the settings for the cue change.
There are several ways to see what cue is running. This topic describes views that do not show the values stored in the cues, but they show the list of cues. To see the content of the cues please read the Looking at the Cue Content topic.
Sequence Executor Sheet
The most common way to look at the Cue Sequence is the Sequence Executor Sheet. It is a window that can be made using the Create Basic Window pop-up. It could look like this:
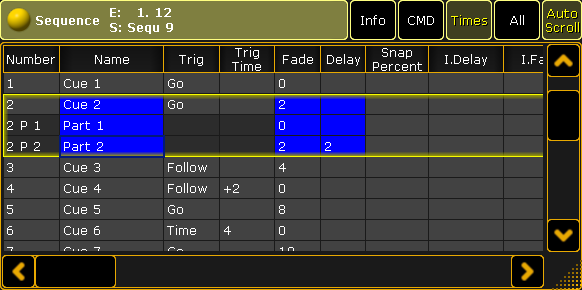
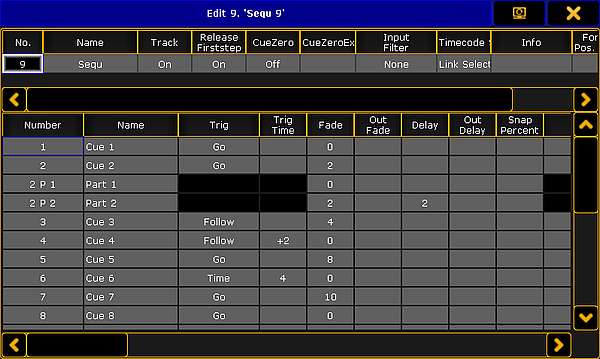
This sheet has a lot of columns. Each column is a setting, information, or action that has to do with each of the cues.
The cues are represented by rows in the sheet.
The active cue will have a yellow frame around it. If a cue is split up into different parts then the "main" cue and the parts all have the yellow frame around them.
The sheet can be customized to display only the relevant columns and the columns can be arranged just like you prefer it - this functionality is described in the Using different view sets in the sheets topic.
The width of a column can be changed. This is done by placing the mouse pointer on the line between two column. When the pointer is the right place then it changes shape and gets a double ended arrow. Then do a left click and hold it while moving the mouse in the direction you wish to change the column. A white box appears above the pointer showing the size of the column and the size change is written in the parentheses. It could look like this:
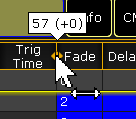
This can also be done using the touch screens and fingers, but it can be easier with the mouse or trackball.
The sheet can be customized and title buttons changed using the Sheet Options - read about them in the Sheet Options topics.
The different columns in the Sequence Executor Sheet
There are many columns in this sheet. The following is a short description of them. The ones that takes a little bit more explaining have links to the relevant topics.
If you cannot see all the columns in your sheet then try to tap the "All" button in the title bar or a blank one. If you do not have any of these, then follow the link above to read about using the view sets.
- Number:
This is the cue number. - Name:
This is the name of the cue. - Trig:
This is the cue trigger. The options here are explained in the Playing back Cues topic. - Trig Time:
This is connected to the trigger. Follow the link above for more information. - Fade:
This is the fade time for all non-snap attributes and dimmer values that does up in value. The Cue Timings topic describes all the different timing columns and their effect on the cue values. - Out Fade:
This is the fade time for dimmer values that does down in value. This is default set to the same as the "Fade" time. - Delay:
This is the delay or wait time between the trigger and the actual fade begins. - Out Delay:
This is the delay for the Out Fade (only dimmer values). Its default value is the "Delay". - Snap Percent:
This can be used to control when "Snap" attributes changes values. It is a percent related to the fade time. This is explained in the Cue Timings topic. - MIB:
MIB is "Move In Black". This is introduced in the What is MIB topic. - Mode:
Cues can have different modes. They are described in the Using Cue Modes topic. - AE:
AE is "Assert Effects". Read more about effects in the Effects section. - CMD:
CMD is "Command". Commands (like the ones written the command line input) can be written in the cues. They will then be executed on the Master or Standalone station when the cue is triggered. Have a look at the Commands in Cues topic for more details. - CMD Delay:
This will ad a delay between the triggering of the cue and the execution of the command. - Loop:
Here it is possible to select a cue that should be looped to. Loops are described in details in the Looping Cues topic. - Ltime:
This is "Loop Time". It is used with loops. Follow link above to learn more. - Lcount:
This is "Loop Count". It is used with loops. Follow link above to learn more. - Path:
Here it is possible to select a path for the cue transition. This is described in details in the Cue Path topic. - Info:
Here it is possible to add multiple lines of information to a cue. Please have a look at the Sequence Info View topic to learn more. - I.Delay:
This is "Individual Delay". It displays the time for attributes that have individual stored delay times. This is discussed in the Cue timings topic. - I.Fade:
This is "Individual Fade". It displays the time for attributes that have individual stored fade times. Follow the link above to learn more. - Forced Pos. Mode:
This will open a pop-up that allows you to select a position mode for the cue. Learn more about position modes in the XYZ and Pan/Tilt in Sequences topic. - Preset types Fade / Delay:
Each preset type has two columns called "Delay" and "Fade". These are discussed in the Cue timings topic.
Temporary Sequence Executor Sheet or Executor Editor
It is possible to open a temporary version of the Sequence Executor Sheet. It appears when an executor is edited.
This can be done by pressing the Edit key followed by one of the executor keys associated with the executor you want to edit.
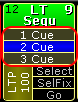
The other way to edit a sequence assigned to an executor is by tapping the middle part of the mini executor, marked here with red:
The editor that appears could look like this:
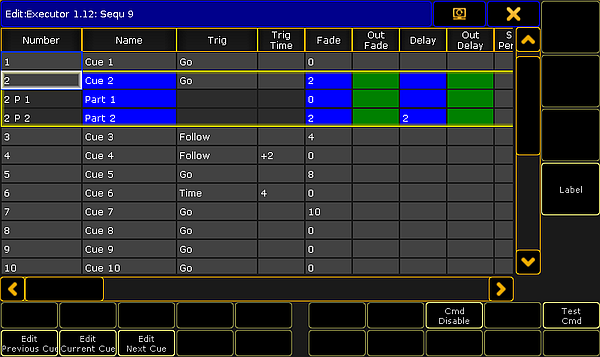
This view has all the columns and rows as the Sequence Executor Sheet. It cannot be customized as the sheet.
It has a few buttons around that is not available in the sheet version:
- Edit Previous Cue:
This will edit the previous cue. Editing a cue means that values stored in the cue will become active values in the programmer. Values can be changed and the Update key can be pressed to update the cue. The cue that is being edited has a red frame around it. Pressing the Esc key will cancel the edit function - and close the pop-up. - Edit Current Cue:
Same as above except the cue being edited is the current active cue. - Edit Next Cue:
Same as above except it is the next cue that is being edited. - Cmd Disable:
This will disable all the commands written in the "CMD" column. If the commands are disabled then the command text color will be red. - Test Cmd:
This will execute the command written in the selected row. - Label:
This can be used to give the sequence a label.
Notice that when this pop-up is open, then the Encoder Toolbar is different. It could look like this:

The top row have some buttons and information.
Starting from the left there is an information "button" that shows the executor number, the sequence number and name, and the cue number and name. It is not actually a button. Next to this is a button that enters or exits the "Edit" mode - This will also change the Encoder Toolbar. Next are six buttons that can be used to control the sequence playback - Please read the Playing back cues topic for more on this. The last button in the top row is used to change between three different pages for the bottom encoder row.
The image above shows the first page - called "Basics". This gives access to change the: Trigger, Trig Time, Mode, and Loop. They are each assigned to one of the four encoders. The settings will change for the selected cues (rows).
The next page is called "Fade Delay" and could look like this:

The top row is the same. It is only the bottom encoder row that changes.
Now the encoders control Fade, Out Fade, Delay, and Out Delay.
The third page is called "Part cont." and could look like this:

Now the encoders control Snap Percent, CMD, CMD Delay, and Info.
Edit the Sequence
The last way to see the cue sequence is by editing the sequence.
This is a command line action. The syntax is: Edit Sequence [number]
This can be done using the keys or by writing in the command line input.
The result is that the Sequence Editor pop-up appears. It could look like this:
This pop-up has two parts: The top part and the bottom part.
The top part is all the settings that can be changed regarding the sequence. They are all described in the What are Cues and Sequences topic.
The bottom part is all the columns and rows from the Sequence Executor Sheet. Everything with a gray background can be edited.