
Looking at the cue content
There are two sheets that can be used to look at the content stored in cues - the stored values can also be edited using the sheet.
They are the Sequence Content Sheet and the Sequence Tracking Sheet. Both are windows that can be created and stored as views using the Create Basic Window pop-up.
Both sheets can be configured using the Sheet Options - access by tapping the yellow ball in the upper left corner.
Sequence Content Sheet
The Sequence Content Sheets is used to see the fixtures and values stored in cues. It looks a lot like the Fixture Sheet, but it has a masking function that only displays what is stored in a cue. It is like a combined Sequence Tracking (read below) and Fixture Sheet.
It could look like this:
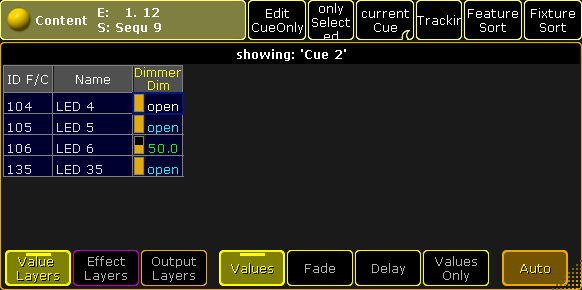
The Title Bar show the number of the executor and the name and number of the sequence the sheet is displaying the content from. If a world other than the default Full world is selected, then this is also displayed in the title bar (Small World icon with a number underneath). The Title Bar will also display any masks assigned (small Ghost icon).

There can be many Title Buttons in the Title Bar. These can be shown or hidden using the Sheet Options - they are access by tapping the yellow ball in the upper left corner.
Some of these buttons and their functions are specific for the Content Sheet. Some are shared with the Sequence Tracking Sheet (reed below). This is short description of their function.
Edit Cue Only
This function is shared with the Tracking Sheet. Turning it On will make any changes you make to values as cue only changes - otherwise it will be made as tracking changes. If you are in doubt about what this means then please read the What is Tracking topic.
Cue Mode
The Cue Mode swipe button is unique for the Content Sheet. It changes what cue in the sequence is displayed.
It has four different options:
- Current Cue:
This will make the sheet display the information related to the current active cue. - Previous Cue:
This will display the values from the previous cue. This is the last cue that was active even if you jump in the cue sequence. - Next Cue:
This displays the values for the next cue if you perform a Go to the sequence. If a cue is "Loaded" then this cue will be displayed. - Manual:
This will add a vertical scroll bar on the right side of the sheet. This scroll bar can be used to scroll through the cues in the sequence and manually select the cue you want to see.
Tracking
This toggle button is also a setting in the Sheet Options in the Layer Mask tab.
This function will hide or show tracked values. If it is On then the tracked values will be shown. If a fixture only has tracked values, then it will also be shown in the sheet.
If this is Off then all tracked values will be hidden. If a fixture only has tracked values then the fixture will also be hidden in the sheet. Hiding the tracked values will make the sheet display only the data that is actually stored in the cue.
Link Mode
The Link Mode swipe button is shared with the Tracking and Executor Sheets. It is used to select what sequence is displayed in the sheets. It has three options:
- Link Selected:
This means that the sheet displays the sequence assigned to the selected executor. - Not Linked:
This will stop automatic linking and display the sequence assigned to the executor selected in the Assign Executor tab in the sheet options. - Link Last Go:
This will display the sequence assigned to the executor where you last performed a Go.
It is also in the sheets options. In the Layer Mask tab - here it is described in a little more details.
Values can be edited directly in the sheet. This will immediately change the values stored in the cues without using the programmer.
Sequence Tracking Sheet
The Sequence Tracking Sheet is used to display all your fixtures and attributes stored in a sequence. It shows a spreadsheet type window where all the cues are rows and all the attributes stored are columns. In the intersection between the rows and column are the stored values displayed. This window allows for a nice overview and a visual flow of attributes through the cues.
An active cue will be displayed using a yellow frame around the row. If a cue is being previewed or edited then this cue will have a red frame.
It could look like this:
The Title bar of the Tracking Sheet functions exactly as the Title Bar of the Content Sheet. There is one Title Button that is unique to the Tracking Sheet.
Selection Only
This toggle button is a masking button that will hide non-selected fixtures in the sheet - but it also hides cues where the selected fixture only have tracked values. The result is that you only see the selected fixtures and where they have active stored values.
This function is also accessible in the Layer Mask tab in the Sheet Options. Remember that the Sheet Options can be access by tapping the yellow ball in the upper left corner.
Editing values in the Tracking Sheet
The cue numbers can be renumbered by editing the number. Read more about this function the Looking at the cue sequence topic.
The names can also be edited in this sheet.
The stored attribute values can also be edited. Doing so will immediately change the values in the cues, bypassing the use of the programmer.
If you edit any value in the sheet, then a Tracking Options pop-up appears. It can do a lot more than just edit the selected values. It looks like this:
There are three parts of this pop-up.
The first is the "Destination". This drop down has three options:
- Attribute:
Apply the changes to the selected attributes only (for example only tilt). - Encoder Grouping:
Apply the changes to every attribute with the same encoder grouping (for example both pan and tilt). - Feature:
Apply the changes to the entire feature (for example the entire shaper module).
The next part is the "Action" part. There are several buttons here:
- Remove individual Fade:
Delete the individual fade times and set it back to the overall cue timing. - Remove individual Delay:
Delete the individual delay times and assign the overall cue delay time. - Remove individual Effect values:
Delete any individual effect values and assign the values from the effect. - Remove Effect:
Remove any effects. - Extract Preset:
Remove the reference to a preset, but keep the values essentially coping the values stored in the preset into the cue. - Block:
Block the "Source" with regards to the "Destination". Tracked values (default colored magenta) are converted into stored values (default colored white). - Unblock:
Unblock the "Source" with regards to the "Destination". Blocked values (default colored white) are converted into tracked values (default colored magenta). - Delete:
Delete the "Source" with regards to tracking and the "Destination". - Delete Cue Only:
Delete the value using cue only (and keep the original values in the following cue).
The left action column can all be selected at the same time, but the right column is mutually exclusive allowing only one action being selected.
The last part is the "Source". It is only selectable when an action is chosen. There are several buttons:
- Selection:
Make the change in the selected cells (with regards to the "Destination"). Cells can be selected as individual, but it is also possible to lasso both vertical and horizontal in the sheet. It is even possible to selected multiple single cells by keeping the Ctrl key on the keyboard pressed while selecting cells. You can even do multiple lassos and single cells with the Ctrl key pressed. - Selected Cue(s):
Make the change in the entire selected cues. - Complete:
Make the change in the entire sequence. - Selected Channels for All Cues:
Make the change for the selected attributes (with regards to the "Destination").
Tapping a source button will perform the action and close the pop-up.
Beside the three parts there is also a button called "Edit". This opens the calculator. Using this allows to change the selected values or assign any relevant presets (with respect to the destination setting). Valid presets are shown in the calculator pop-up. If you want to edit a value as Cue Only, then you need to remember to activate the Cue Only function before editing the value. This is easiest with the Cue Only button visible in the Title Bar.
With a combination of the different parts and the Edit button you can make almost any desired changes in the Tracking Sheet.
The pop-up can be closed by tapping the yellow X in the upper right corner of the pop-up. This will cancel any actions.