
Store Options and Defaults
When cues are stored then there are some options that will be used.
Each user (profile) can have their own default options.
During the store it is also possible to add commands that will use a specific set of store options.
In this topic the options regarding storing cues are described. Some of these options will impact how other cues will respond. Elements regarding tracking are described in the What is Tracking topic.
Store Options
The default store options are found by pressing the Setup key followed by the Store Options below the "User" tab. It could look like this:
On the left side are two areas called "Data Source" and "Use Selection". It is these two sections that are described here.
The "Presets" options are described in the Create Presets topic. "If not Empty" is described in the Store Cues topic.
Store Filter is described in the What are Filters topics. Cue Only and Tracking Shield is discussed in the What is Tracking topic. Position data (Active Position Data, XYZ, and Pan/Tilt) is relevant when XYZ position programming is activated. Read more about it in the Programming XYZ section.
Data Source
This is the source that will used when storing.
- Prog. (Programmer) - This is the default option:
Stores the content in the programmer. - Output:
Stores the status of the current output from the console. The output can be affected by masters and DMX profiles. The DMX sheet will show what the output actually is. - DMX In:
Stores the current DMX input.
Use Selection
This decides what values, from the source, will be used when storing.
- Active - This is the default option:
Stores the values that are active in the programmer, but with respect for the source selected above. - All for selected:
Stores all attributes of the fixtures selected in the programmer, also with respect for the source selected above. - Active for selected:
Stores only all active attributes but only for the fixtures selected in the programmer, also with respect for the source selected above. - All:
Stores all attributes for all fixtures. - Look:
Look stores all dimmer attributes and for the fixtures that have a dimmer values above 0 all attributes will be stored.
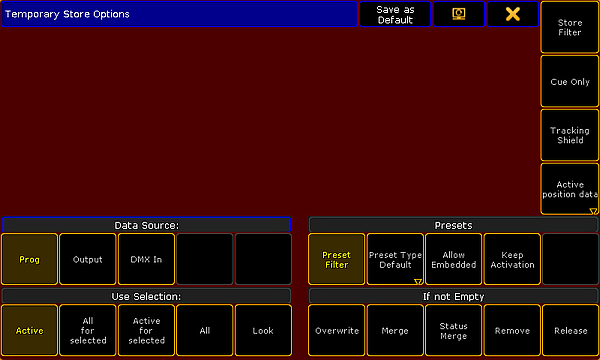
Temporary Store Options
The store options can also be opened as a temporary version.
This can be done by pressing and holding the Store key for approximately one second.
This looks like the normal Store Options except it got two extra buttons in the title bar.
One is the "Change Screen" button that allows you to move the pop-up to a different screen.
The other is called Save as Default. This can be used to save the current temporary options as the new default options into the current User Profile.
Store Encoder Toolbar
When "Store" is the active keyword, then the Encoder Toolbar will display the "Store Encoder Toolbar". It could look like this:

The top row has a lot of buttons. Short description from left to right:
- Data Source:
This is the data source swipe button - read description above. - Use Selection:
This is the use selection swipe button - read description above. - If not Empty:
This is the if not empty swipe button - read description in the Store Cues topic. - Store Filter:
This button opens the Store Filter pop-up - read about it in the Use Temporary Filters topic. - Value Layers:
This on/off button filters the Value Layers - read about the layers in the Layers in Sheets topic. - Value Time Layers:
This on/off button filters the Value Time Layers - read about it by following the link above. - Effect Layers:
This on/off button filters the Effect Layers - read about it by following the link above. - Cue Only:
This on/off button will activate the Cue Only function. It is mutually exclusive with the Tracking Shield function. Read about Cue Only in the What is Tracking topic. - Tracking Shield:
This on/off button will activate the Tracking Shield function. It is mutually exclusive with the Cue Only function. Read about Tracking Shield following the link above. - Page change:
This will toggle the pages for the bottom row.
The bottom row has four options. These can be adjusted using the encoders.
For page one it is the "Fade", "OutFade", "Delay" and "OutDelay" times. The values here are the values that will be used when the store action is carried out.
As mentioned above there are two pages to this Encoder Toolbar. The second page could look like this:

It is only the bottom row that changes.
Now the encoders control the "SnapPercent", CmdDelay", "Trig", and "TrigTime" values.