
Use Predefined Effects
The simplest way to use effects in the grandMA2 is to work with predefined effects.
Requirement:
- Apply fixtures in the Patch & Fixture Schedule.
For more information on patching see Adding fixtures to your show. - Import predefined effects.
For more information on how to import effects see Import via user interface.
To apply the predefined effects:
- Select fixtures in the fixture sheet.
- Tap anywhere in the user-defined area.
- The pop-up Create Basic Window opens.
- Next, tap Pools.
- Then, tap Effects.
- The pool with predefined effects opens.
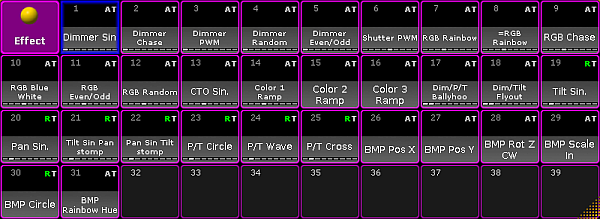
- Tap an effect in the effect pool.
- The effect has successfully been applied to the fixtures that were selected.
It is also possible to add single predefined effects to the pool.
To do so:
- Press Edit and tap an empty cell in the pool with predefined effects.
- An empty effect editor opens.
- Tap Load Predefined on the right of the window and the pop-up Select Predefined Effect opens.
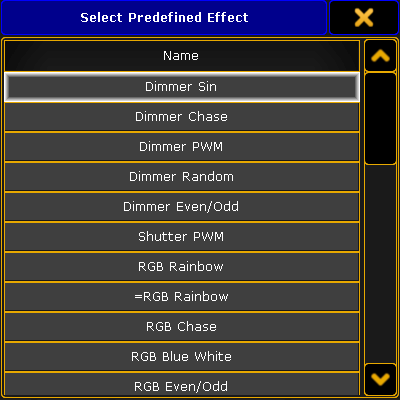
- To add an effect, tap a name in the pop-up.
- The effect editor opens and the effect is now displayed in the pool.
Edit a Predefined Effect
To edit a predefined effect:
- Press Edit and then tap an effect in the effect pool.
-or-
Use the command line entering for example:
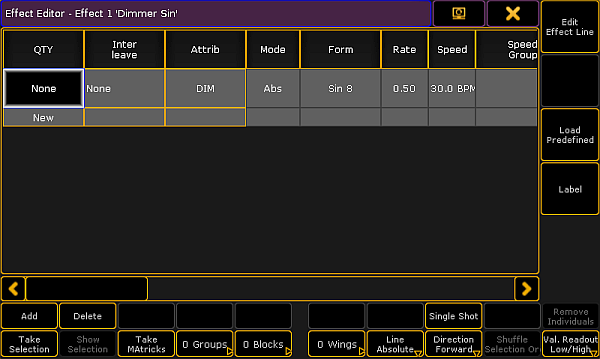
Columns in the Effect Editor
The effect editor contains the following columns and buttons:
- Select fixtures in the fixtures sheet.
- Tap Take Selection.
- This template effect is now a selective effect.
To turn the selective effect back to a template effect:
Press Clear and tap Take selection.
The following columns are all edited a similar manner, except for tapping different columns.
- Interleave:
Defines the fixtures that are to use the effect. Interleave only works in selective effects.
- Press Edit and tap a cell or tap and hold a cell in the column Interleave.
- The pop-up Select Interleave opens.
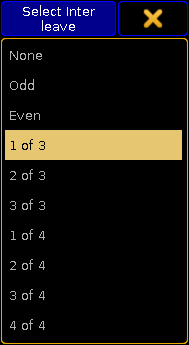
- Now, select the interval in which the effect is to run.
- Attrib:
Displays which attribute is used in the effect line.
- To change the attribute, tap the corresponding column.
- The pop-up Select Effect Attribute opens.
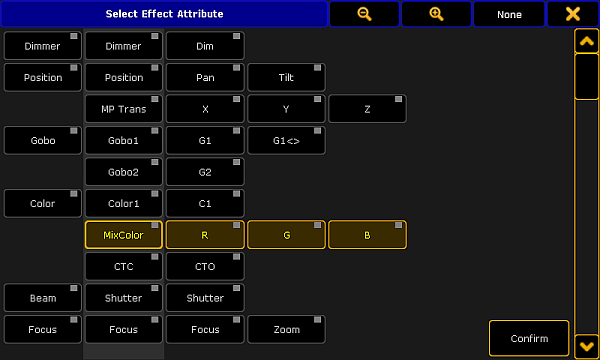
- Tap an attribute and then tap Confirm.
- The effect lines now have the selected attribute.
- Mode:
The column mode corresponds to the effect modes absolute and relative.
It is also possible to change the mode in the column via the button Line Absolute:
To toggle the button to Line Relative, tap Line Absolute and vice versa.
- Form:
Displays all 23 forms of predefined effects.
To apply a form:
- Tap the corresponding column.
- The pop-up Select Form opens.
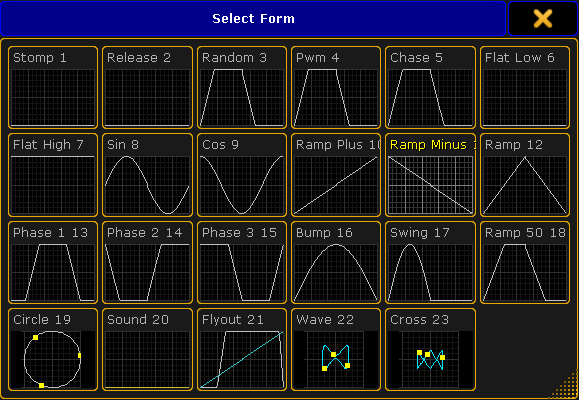
- To take over the form automatically into the editor, tap a form.
- The fixtures now run in an effect that was selected.
Both, rate and speed set the speed of an effect.
- Rate:
Rate represents the factor of speed.
The default setting is Rate 1 which corresponds to 60.0 BPM. - Speed:
Speed represents the unit of the speed in BPM, hertz or seconds.
Set the default of the unit of speed in Setup – User – Settings – Speed Mode.
Apply rate and speed:
- Tap the corresponding column.
- The calculator opens.
- Set the rate or speed and tap Please.
- The value is now applied.
It is sufficient to set either rate or speed, since the modes adjust to each other.
- Speed Group:
Links an effect to rate or the speed master.
Using the effect on a speed master overwrites the speed set in an executor. For more information on the speed in an executor see Advanced Executor Functionality – Speed masters.
To set a speed group:
- Tap the corresponding column.
- The pop-up Select Speed / Rate Master opens.
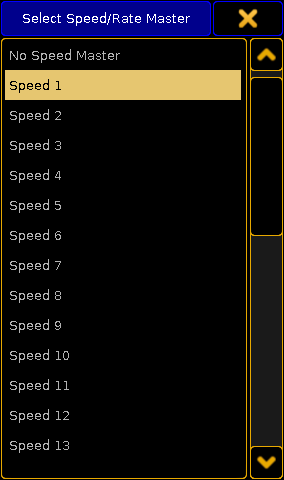
- Select the speed group.
- The group is now applied.
- Dir:
Dir displays the direction of the effect.
To select the direction:
- Tap the corresponding column.
- The pop-up Select Dir opens.

- To apply the direction, select one.
- The direction is now applied.
It is also possible to change the direction of an effect by tapping the button Direction Forward. To toggle between the directions, tap the button accordingly.
- Low Value:
Sets the lowest point an effect reaches. - High Value:
Sets the highest point an effect reaches.
To set the low and the high values:
- Tap the corresponding column.
- The calculator opens.
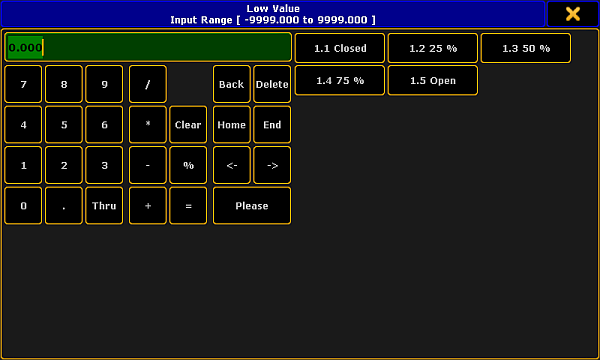
- Set the value or tap a preset on the right of the calculator and then tap Please.
- The value is now set.
It is also possible to set a range of values in Low Value and High Value.
1. Type in the calculator the value starting the range.
2. Tap Thru.
3. Then type the second value ending the range.
- Phase:
Displays the time setting that single fixtures use within an effect.
Phase is distributed among the number of fixtures.
To set the phase:
- Tap the corresponding column.
- The calculator Edit EffectLine Phase opens.
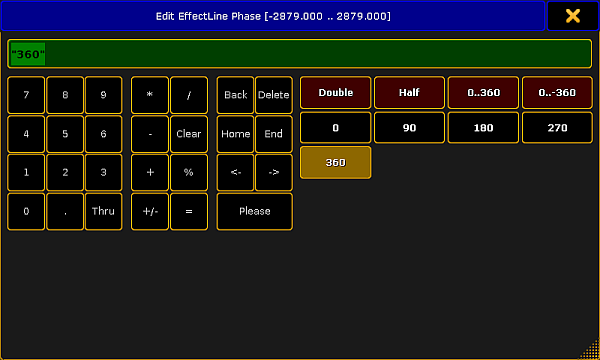
- Set the degrees in the numeric pad or tap the buttons on the right of the calculator.
- The phase is now applied.
- Width:
Sets the width of an effect.
Width is not applied with the form Chase.
Example:
If you set the width of the form Pwm to 20 %, this percentage is displayed as the high value and the residual 80 % display the low value.
To set the width:
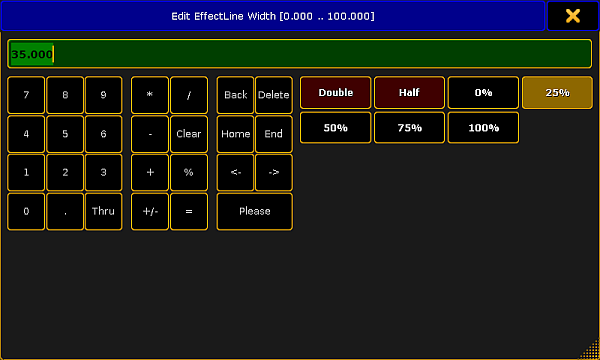
- Set the value and tap Please.
- The value set is now applied to the effect.
- Attack:
Appears quickly and outfades the values.
- Tap the corresponding column.
- The same calculator as in editing the width opens.
- Set the value and tap Please.
- The value is now applied to the effect.
- Decay:
Appears quickly and infades the values.
Set the decay in the same manner as the attack.
Both, Attack and Decay display fade in and fade out times.
It is possible to apply Attack and Decay for the forms Random, Pwm and Chaser.
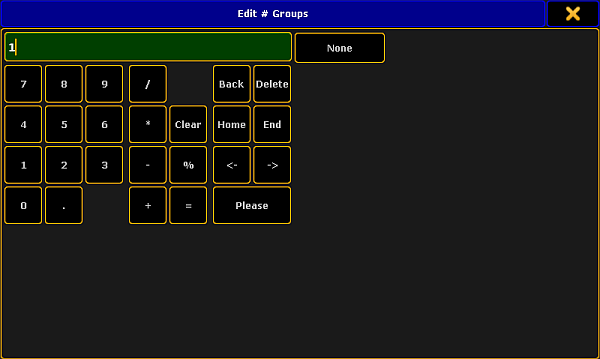
- Groups:
Phases are divided corresponding the number of groups.
To set the number of groups:
- Tap the corresponding column.
-or-
Tap 0 Groups at the bottom of the effect editor. - The calculator opens.
- Blocks:
Blocks collaborate with Phase. Fixtures next to each other execute the same phase.
To set the number of blocks:
- Tap the corresponding column.
-or-
Tap 0 Blocks at the bottom of the effect editor. - The same calculator as in Groups opens.
- To proceed see numbers 3 and 4 in Groups.
- Wings:
The Phase is applied starting outwards and moving inwards.
To set the number of wings:
- Tap the corresponding column.
-or-
Tap O Wings at the bottom of the effect editor. - To proceed see numbers 3 and 4 in Groups.
There is an exception to the cycle of wings. In Pan effects which consist of 2 wings, one of the wings is inverted. Hence, fixtures run towards each other.
- Single Shot:
Displays one execution of effects.
To set a single execution of an effect:
- Tap the corresponding column.
- The cell now displays Yes and the button Single Shot is enabled (highlighted in yellow).
-or-
To disable the single execution, tap the button Single Shot at the bottom of the effect editor. - To disable the single execution, tap and hold the cell displaying Yes or tap the button Single Shot.
Buttons in the Effect Editor
This paragraph deals with buttons contained in the effect editor and their corresponding functions:
- Add an new attribute to an effect, tap New in the column QTY and then tap Add.
-or-
Tap Add in the lower left corner of the effect editor and the pop-up Select Effect Attribute opens.
- Select the attribute you would like to add to the effect line.
- Then, tap Confirm.
A new attribute is now applied to the effect line. - To delete effect lines, tap Delete.
- Display all fixtures that are assigned to an effect line.
To do so, tap Show Selection.
If fixtures are selected, this button is enabled. If it is a template effect, it is grayed out. - To randomly rearrange the execution of an effect, tap Shuffle Selection.
The succession of the effect changes every time you tap the button.
This button is enabled if fixtures were selected in the effect. - To take over the current MAtricks settings into an effect line, tap Take MAtricks.
- Then, select the display of the values.
To display the the values for relative values in the effect line, tap Val. Readout Low/High to toggle it to Val. Readout Center/Size.
To set the readout of values automatically so it adjust to the values, tap to toggle to Val. Readout Auto.
Relative effects are then automatically readout as Center/Size and absolute effects as high and low values. - To remove effects that deviate from the majority of the effects in an effect line, tap Remove Individuals.
For more information on the keyword see RemoveIndividuals.
Example:
- Select 10 fixtures in the fixture sheet.
- Apply the effect cosine to 8 of the fixtures.
- Then apply the effect sinus to the residual fixtures.
If you create two different effects in the programmer and store them into the effect pool, they are displayed in a dusky pink in the effect editor.

If you tap Remove Individuals, a warning appears.
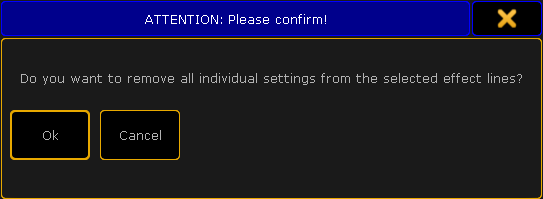
To close the pop-up, tap Cancel or ![]() in the upper right corner of the pop-up.
in the upper right corner of the pop-up.
To remove the individual settings, tap Ok.
Removing the individual settings modifies the effect.
- Label the effect:
-Tap Label on the right of the editor.
-The calculator opens.
-Type the name and press Please.
-The effect is now labeled. - Edit the effect line:
-Select an effect line in the effect editor.
-Tap Edit Effect Line.
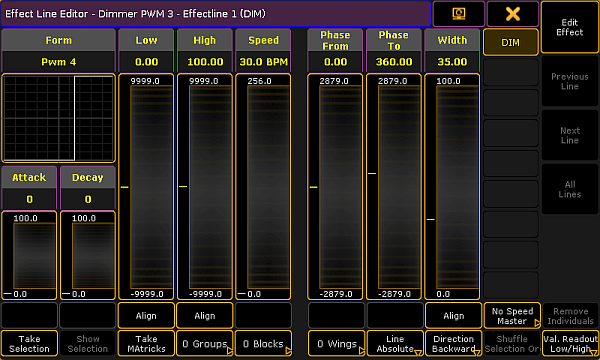
-The Effect Line Editor opens.
It is also possible to select and deselect the attributes on the right of the effect line editor, right below the
- To deselect the effect line, tap the button.
- To select it, tap the button once again.
Form:
Displays the graphic representation of the form in an effect.
Attack and Decay:
Modifies the form of the effect with the help of faders.
- To modify the form of the effect, tap and move the faders in the columns Attack or Decay accordingly.
The faders on the right of Form, Attack and Decay represent the values of Low, High, Speed, Phase and Width.
- To set the values, tap and move the faders in the corresponding columns accordingly.
It is also possible to set the values via a calculator:
- Tap a heading, for example Low.
- The calculator opens.
- Type the value and tap Please.
- The values have been set via the calculator.
Align:
Sets the range of a value.
- To define the range of a value, tap Align below the corresponding fader.
- The fader divides into two.
- Set the range by moving the faders that were divided.
- To select a preset, tap Align once more.
- The button is now toggled to Preset. For more information on effects that use presets see Create an effect that uses presets.
- Tap Preset to toggle the button back to Align.
To close the effect line editor, tap ![]() in the upper right corner.
in the upper right corner.