Display
The Display tab has potentially a lot of options - all dealing with how the data in the sheets are presented to you.
This topic lists all the possible options in the sheets, but each sheet does not have all options.
Sheet Style
Sheet Style is an option in Fixture and Content sheets.
This can be used to turn how the data is presented in the sheets.
There are two options:
- Horizontal:
This will present the fixtures as rows and the Attributes as columns. - Vertical:
This will organize the fixtures as columns and the Attributes as rows.
The default is Horizontal, but some like to use the vertical in situation where you have few fixtures. For instance when programming Media Servers.
Font
Font is an option in all sheets.
There is currently only one font type available in the grandMA2 software. So the only thing to change regarding the Font is the size.
Tapping the button opens the Small Select Font pop-up. It looks like this:
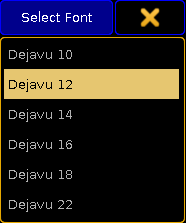
Here it is possible to select one of the six different sizes - ranging from 10 to 22.
Readout
Readout is an option in Channel, DMX, Fixture, Content, and Tracking sheets.
The readout determines how the values are displayed in the sheets.
Tapping the button opens a small Select Readout pop-up like this:
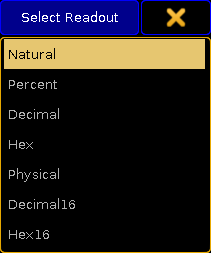
Here it is possible to select one of the following options:
- Natural:
This displays the value defined in the "From" and "To" columns in the fixture profile. The range is customized, but is is always displayed with one decimal accuracy. It can even be a negative value. This can be useful when the attributes default values is not at the end of the range - for instance with Pan attributes. - Percent:
Displays the attribute values as a percent without any decimal numbers. Range is 0 through 100. - Decimal:
Displays the attribute values as an 8-bit DMX value. The range is from 0 through 255. - Hex:
This displays the DMX values in 8-bit Hexadecimal numbers. The range is from 0 through FF. - Physical:
This displays the value defined in the "From Phys" and "To Phys" columns in the fixture profile. Just as with the Natural readout, it is possible to customize the range but it is always displayed with one decimal accuracy. The idea is that values here matches the physical values for the fixtures. So for instance the zoom range of a fixture is matched to the physical range of the fixture making the sheets display the actual zoom degree. - Decimal16:
This is just like the Decimal readout except the DMX value is displayed in a 16-bit range. The range is from 0 through 65 535. - Hex16:
This is just like the Hex readout except the DMX value is displayed in a 16-bit range. The range is from 0 through FFFF.
Changing the readout for a sheet and then tapping in the sheet will also change the readout on your Encoder Bar.
Readout can also be a Title Button.
Cue Color Columns
Cue Color Columns is an option in Executor and Tracking sheets.
The Appearance keyword can be used to give a color to individual cues. This option changes how this color is displayed in the sheets.
Tapping the button opens the small Select Cue Color Columns pop-up. It has two different sizes regarding the options. There are more options in the Executor sheet than in the Tracking sheet. This is the pop-up from the Executor sheet:
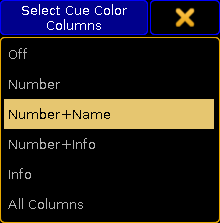
The options in the pop-up are:
- Off:
This wont display any cue colors. - Number:
This will display the color in the cue number column. - Number+Name:
This will display the color in the cue number and name columns. - Number+Info:
This will display the color in the cue number and info columns. - Info:
This will display the color in the info columns only. - All Columns:
This will display the color in all columns.
The Tracking sheet only has the three first options.
Sort By
Sort By is an option in Content and Tracking sheets.
This option can be used to choose the sort method for the sheets.
There are two options: Fixture ID or Channel ID. This option makes sense if your fixtures do not have the same number as Fixture ID or Channel ID. Then this chooses the priority for the sorting.
Symbol Output
Symbol Output is an option in Channel and Fixture sheets.
The Symbol Out is a small square next to the Channel ID in the Channel Sheet and next to the fixture name in the Fixture Sheet. This square shows the combined intensity and color output from the fixture.
Tapping the button opens the small Select Symbol Output pop-up. It looks like this:
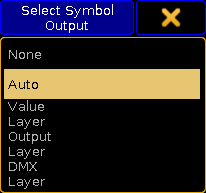
The options are:
- None:
The square is hidden. - Auto:
The squares output follows the selected layer. - Value Layer:
The square displays the output from the Value Layer. - Output Layer:
The square displays the output from the Output Layer. - DMX Layer:
The square displays the output from the DMX Layer.
For more information about the different layers please read the Layers in sheets topic.
Symbol Feature
Symbol Feature is an option in Channel, Fixture, Content, and Tracking sheets.
Each feature of the fixtures can have a small symbol displaying a graphic representations of the features value. This symbol can be shown or hidden.
For instance the dimmer value is represented by a dimmer bar. The position values are represented by vertical and horizontal line intersecting. Gobos are displaying a small image of the gobo. Colors are displayed as small squares displaying the colors next to each color feature.
Cue Colors
Cue Colors is an option in Channel, Fixture, Content, and Tracking sheets.
This option allows you to select how attribute values should be presented in the sheets.
Tapping the button opens the small Select Cue Colors pop-up. It looks like this:
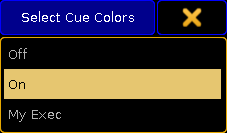
There are three options:
- Off
All attribute values are displayed with a yellow color. - On
The attribute values from the primary selected executor displays the colors Cyan, Green, White, and Magenta. These colors are described in detail in the Cue Colors Topic. Values from other executors are displayed in yellow. - My Exec
This will color the values from the primary selected executor in Cyan, Green, White, and Magenta. Other executors triggered by your user are displayed in yellow. Values from executors triggered by other users are displayed in a gray color.
Namefield
Namefield is an option in Channel, Fixture, Content, and Tracking sheets.
The name field can be turned On or Off. When it is On then the name of the fixture is displayed in the sheet.
Channel ID
Channel ID is an option in Channel, Fixture, Content, and Tracking sheets.
The Channel ID can be turned On or Off. When it is On then the Channel ID will be displayed in the sheet.
If the fixture has both a Channel ID and Fixture ID and the ID number is the same, then there is only displayed one number even if both Channel ID and Fixture ID is On. If the fixture has two different ID numbers and both are set to On, then they are shown separated by a colon. The Fixture ID is on the left side of the colon and the Channel ID is on the right side.
Fixture ID
Fixture ID is an option in Channel, Fixture, Content, and Tracking sheets.
The Fixture ID can be turned On or Off. When it is On then the Fixture ID will be displayed in the sheet.
If the fixture has both a Channel ID and Fixture ID and the ID number is the same, then there is only displayed one number even if both Channel ID and Fixture ID is On. If the fixture has two different ID numbers and both are set to On, then they are shown separated by a colon. The Fixture ID is on the left side of the colon and the Channel ID is on the right side.
Columns
Columns is an option in Channel, DMX, Fixture, and Content sheets.
Tapping the green input field allows you to set a number of columns in the sheets.
The column number is only used in Fixture and Content Sheets if the sheet is in Vertical Sheet Style.
Autoscroll
Autoscroll is an option in Executor, and Tracking sheets.
The Autoscroll function can be turned On or Off. When On it automatically scrolls the cue sequence list in the Executor and Tracking Sheets. This makes sure the active cue is always visible in the sheet.
Autoscroll can also be a Title Button.
Feature Sort
Feature Sort is an option in Fixture, Content, and Tracking sheets.
The sheets can activate an automatic sorting of the features. This will move the attributes of the current feature so it is right next to the name of the fixture or cue. This should avoid a lot of scrolling in the sheets.
Feature Sort can also be a Title Button.
Fixture / Channel Sort
Fixture Sort or Channel Sort is an option in Channel, Fixture, Content, and Tracking sheets.
In the Channel Sheet it is called Channel Sort, in the other sheets it is called Fixture Sort. The function is the same. The selected fixtures are displayed first in the sheets and they are displayed in the selection order.
Fixture Sort or Channel Sort can also be a Title Button.
Marker
Marker is an option in Channel, Fixture, Content, and Tracking sheets.
The colored markers in the sheets provide additional information of what is affecting the values and to display what information might be stored in cues. These markers may be turned On or Of.
Read more about the markers in the Maker Colors topic.
Preset Readout
Preset Readout is an option in Channel, Fixture, Content, and Tracking sheets.
Preset Readout is used to change how the preset ID is displayed in sheets. This is relevant when an attribute gets its values from a preset.
Tapping the button opens the small Select Preset Readout pop-up. It looks like this:
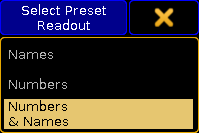
The options are:
- Names:
The name of the preset will be displayed. - Numbers:
The number of the preset will be displayed. - Numbers & Names:
Both the number and the name of the preset will be displayed.
Hide Empty Cells
Hide Empty Cells is an option in Channel, Fixture, Content, and Tracking sheets.
When a mixture of fixture types are patched in a show it can often happen that not all the fixtures have the same features. This means that a sheet can have empty or unused cells. These cells can be hidden in the sheets. This can often provide a better overview of the features available in the fixtures.
Turning Hide Empty Cells On will hide these unused cells.
Hide Timing Countdown
Hide Timing Countdown is an option in the Executor sheets.
In the Sequence Executor Sheet you can see the cue times. When a fade is running you can choose to have the time count down to 0 or just always display the time stored in the cue.
Hide Timing Countdown is an On or Off function. When it is On, then there is no visible count down. When it is Off then the count down is displayed.
Hide Timing Countdown can also be a Title Button.
Show Additional
Show Additional is an option in the DMX sheets.
This function is used to display more information in the DMX Sheet than just the DMX values.
Tapping the button opens the small Select Show Additional pop-up. It looks like this:
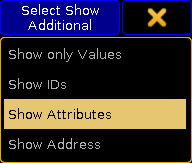
The options are:
- Show only Values:
No additional information are displayed.
DMX values without additional information
- Show IDs:
The fixtures ID numbers and names are displayed above the DMX values. They are only displayed once per fixture - the ID is nor displayed above each DMX value.
DMX values with ID number and name
- Show Attributes:
The attribute connected with the DMX address is displayed above the DMX value.
DMX values with attribute name above the values
- Show Address:
The DMX address is displayed above each DMX value.
DMX values with DMX addresses above each value
Show Additional can also be a Title Button.
Show Only Selected
Show Only Selected is an option in the DMX sheets.
This will limit the DMX sheet to only display the universes of the selected fixtures.
Show Only Selected can also be a Title Button.
Programmer Colors
Programmer Colors is an option in the DMX sheets.
There are two color schemes for the DMX values in the DMX sheet.
There is the default where the background color changes from gray to light green depending on intensity of the value.
But you can choose to use turn On Programmer Colors instead. This will then use the same color schema as the Channel and Fixture Sheets.
Programmer Colors can also be a Title Button.
Merge Same Values
Merge Same Values is an option in Fixture, Content, and Tracking sheets.
Some features can combine or merge the values displayed in the sheets if the value is the same. For instance the MixColor attributes "R", "G", and "B". If these three attributes have the same value then it is only displayed once - as a merged value. If they have different values then they are split up into each displaying the values they have.
This merge function can be turned On or Off.
MixColor Readout
MixColor Readout is an option in Fixture, Content, and Tracking sheets.
The MixColor system is a way to present the same attributes to the operator no matter if the fixtures uses different color systems. This means that the operator does not have to change between the different colors systems. In the sheets it is then possible to change how this is displayed.
Tapping the button opens the small Select MixColor Readout pop-up. It looks like this:
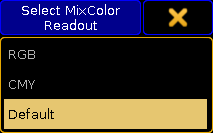
The options are:
- RGB:
The MixColors are displayed as RGB attributes. - CMY:
The MixColors are displayed as CMY attributes. - Default:
The MixColors are displayed using the default selected in the setup - Read more about setting this in the User Settings topic.
MixColor Readout can also be a Title Button.
RDM Info
RDM Info is an option in Channel, and Fixture sheets.
The RDM info is a small RDM icon that will be displayed next to the fixture name or ID.
Tapping the button opens the small Select RDM Info pop-up. It looks like this:

The options are:
- None:
No icon is displayed in the sheet. - Warning:
The yellow RDM warning icon is displayed in the sheet. - Alert:
The red RDM alert icon is displayed in the sheet. - Warning & Alert:
Both icons can be displayed in the sheets.
Read more about RDM and how to configure the warning and alert notifications in the RDM section.

