
Configure ports of the MA Network Switch
This topic describes the different port settings and how to configure the ports.
You can configure the following options:
- Port description
- Group
- RSTP (= Rapid Spanning Tree Protocol)
- Speed
- LAG (= Link Aggregation Group)
Port description
To have a better overview about what is connected to what port, you can change the port description of each port.
The port description has a maximum length of 8 characters.
The following characters are allowed.
- Upper case letters A...Z
- Lower case letters a...z
- Numbers 0...9
- Spaces, minus (-), plus (+), underscore (_)
Groups
You can assign one group for each port. Two devices must be part of the same group to communicate.
Groups are a logical segment of network users (= VLAN). With groups it is possible to send different signals in different groups via the same network cable without affect the other signal. For example sound and light signals.
The groups for port 1 through 13 can be manually configured. By default, all groups are managed groups.
The assigned group is visible at the front end display of the MA Network Switch and indicated by the group LED.
The switch has eight different groups.
- Group01 (Red)
- Group02 (Yellow)
- Group03 (Green)
- Group04 (Cyan)
- Group05 (Blue)
- Group06 (Magenta)
- Trunk (White)
- Manage (Gray)
If more than one switch is in a network and more than one group is in use, the Trunk is needed to forward all group packets to the other switches. The Trunk bundles all other groups.
You need at least one manage group in the network.
If no manage port is in the network you can not configure the switch anymore. A factory reset is necessary.
Use port 13 on the front panel as management port to connect the PC for switch configuration via the web interface.
RSTP
Rapid Spanning Tree Protocol (RSTP) uses point-to-point wiring and provides rapid convergence of the spanning tree.
If there are more than one point-to-point connections between two switches RSTP manages the redundant link unless the original connection fails.
The MA Network Switch supports an implementation of RSTP that is compatible with the IEEE 802.1w standard and does not support per VLAN RSTP. This means that the MA Network Switch will send out and expect to receive untagged RSTP messages.
By default, RSTP is enabled.
- Disabled
The switch does not run RSTP for this port. If RSTP is disabled, LLDP (Link Layer Discovery Protocol) is disabled as well. - Enabled
The switch runs RSTP for this port. If RSTP is enabled, LLDP (Link Layer Discovery Protocol) is enabled as well.
Speed settings
You can edit the port speed of each port on the MA Network Switch.
The selected speed is visible at the status page on the web interface.
If a port is connected, the link LED is blinking in the speed color. For more information see MA Network Switch manual.
There are three speed settings available:
- Auto: The port detects automatically the speed of the connected device (default).
- 100Mbit
- 1Gbit
LAG
The Link Aggregation Group (LAG) combines a number of physical ports for them to behave as one connection.
Configure the LAGs via the web interface or in the MA Network Configuration menu – Edit LAGs. For more information see MA Network Switch.
Select between 6 LAGs:
- None
- LAG01
- LAG02
- LAG03
- LAG04
- LAG05
- LAG06
Set a port to an LAG in the same manner as in setting a group to a port.
-If a port is set to an LAG, its settings – group, speed etc., – are adjusted to the default settings of the LAG.
-Changing settings on a port that has an LAG membership, changes these settings in other ports of the LAG.
Configure ports
Requirement: Added MA Network Switch to the network configuration.
To configure the ports:
- Open the MA Network Configuration.
- Press Setup, and tap under Network MA Network Configuration.
The MA Network Configuration window opens. - Tap at Network Switch.
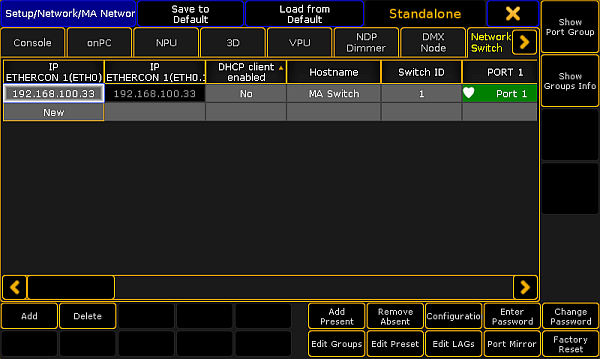
MA Network Configuration - Network Switch - Tap and hold in the cell of a port or tap in the cell and press the screen encoder.
The Configure Switch Port pop-up opens.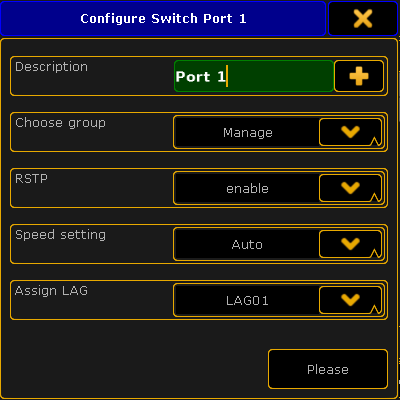
Configure Switch Port pop-up - Configure the port.
- Enter in the green edit line a new port description.
- To choose a group tap in the groups field at the arrow down and tap at a group in the drop-down.
- To disable RSTP tap in the RSTP field at the arrow down and tap at disable.
- To change the speed settings tap in the speed setting field at the arrow down and at a speed setting in the drop-down.
-To assign an LAG, tap the drop-down in the filed Assign LAG. - Press Please or tap Please.
The port is configured and the changes are saved in the startup configuration.