
Auto-calibrate fixture positions
The Auto-calibration is a system where the software positions moving light fixtures based on four makers on the real floor. This can work, but you and the fixtures needs to be precise.
One of the big advantages with having a precise position and rotation of your moving lights is the option to use XYZ position programming.
You can access this system using a Stage View and opening the Stage View Options. Here is a tab called "Calibration". In this tab you will find a single button called Calibrate Fixture Pos. Tapping this will open the Calibration pop-up.
It could look like this:
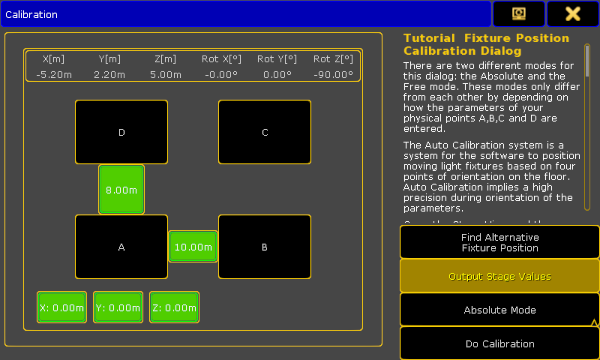
This is separated into a left and a right side.
The left side is used to define the markers on the floor.
The right side has short description of the workflow in this view. There are also four buttons used to control the calibration function.
The first button is called Find Alternative Fixture Position. This can be used to change the rotation and/or position of the selected fixtures. The fixtures might move or rotate. It still points to the same spot in the 3D space, but use a different set of values for the fixture rotation and position.
When the Output Stage Values button is active, then the currently selected fixtures will output the Stage values. Stage values can be edited in the Parameter List, Fixture Types editor and in the Fixture editor.
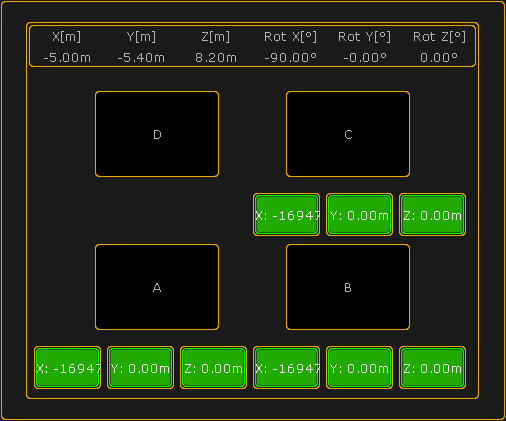
You can use two different modes for the calibration process. One is called Absolute Mode and the other is Free Mode. You can change between the two modes by tapping the Mode button on the right side of the pop-up.
The difference is in the left side of the pop-up. The Free Mode could look like this:
The last button on the right side is the "Do calibrate" button. This is the one you press when you are ready for the automatic calibration.
The left side is used to define the positions of the markers on your floor.
At the top you will see the current position and rotation of the last fixture you selected.
For the calibration you will need to mark the corners of a rectangle on your real stage - point A, B, C and D. And you need to tell the software where your rectangle is.
If your rectangle is at a level plane of your stage, you can use the Absolute mode. If the rectangle needs to be on a sloping part of your stage then you need to use the Free mode. Each fixture can have its own rectangle but they can also share the same rectangle. If there is an * symbol next to the A, B, C, or D then your selected fixtures do not share the same rectangle.
In Absolute mode you define the X, Y and Z position of corner A and then you specify the distance from corner A to corner B and corner D. This will give you a rectangle.
In Free mode you define the X, Y and Z position of three corners (A, B and C). This allows you to create a rectangle on a sloped plane.
When you have selected one or more fixtures and created a rectangle in this pop-up you will see the markers it in the Stage view.
Calibrating fixtures for the first time
These are the steps needed to calibrate fixtures for the first time (sharing the same rectangle):
- Create the markers/rectangle on the floor.
- Patch the fixture(s) and do not switch on the XYZ support.
- Setup the approximate XYZ positions for your fixtures. If you do not know how then you can read about it in the Position fixtures in the 3D stage topic.
- Invert the Pan/Tilt channels to have the right movement in your Stage view and the real world.
- Store 4 Pan/Tilt position presets for the 4 corners A, B, C and D for your real rectangle. (Here you can use the Stage View with Follow to get the positions a bit quicker than only with the Pan/Tilt encoders).
- Open this calibration pop-up in the Stage View Options.
- Put in the dimensions for the rectangle.
- Call the Pan/Tilt preset A in your programmer, with all fixtures selected, and now press Store key and the A button on the calibration pop-up.
- Repeat the procedure for corner B, C and D - pressing the respective buttons in the view.
- Now select all fixtures and tap the Do Calibration button in the pop-up.
- If you want to use XYZ positions programming, you can now go to the Fixture Type in the Setup and switch on the XYZ support.
Now the fixtures are moved and rotated in the Stage View. If it look really weird, please try the calibration process again - maybe with a flipped set of values.
Now you can use the XYZ encoders to store positions in your cues.
Re-calibrating fixtures after the initial setup
These are the steps needed to re-calibrate fixtures if they have moved position:
- Open the Calibration pop-up from the Stage View Options.
- Select the fixtures and bring up the dimmer channels or use Highlight.
- Push the A button in the Calibration pop-up.
- The position mode of the fixture will switch to Pan/Tilt and you can correct the positions for the fixtures. In this case do not use the "Follow" in the stage view because it automatically switch the position mode to XYZ.
You cannot store XYZ values on the A, B, C and D corners!
- With the new Pan/Tilt values, press the Store key and overwrite the corner A.
- Repeat the procedure for corner B, C and D.
- Now select all (relevant) fixtures and push the Do Calibration button in the pop-up.
All XYZ values in your show are now updated!
Some rules and limitations
There are some rules and limitations using XYZ position programming:
- XYZ, Flip, Mark, and Dist. (Distance) are 6 parameters more you need per fixture.
- Distance is used for conversion between XYZ and Pan/Tilt values. Do not delete it!
- You cannot Park the new virtual XYZ, Flip, Mark, and Distance parameters.
- After the calibration and programming do not invert the DMX Pan or Tilt attributes.
- After the calibration and programming do not move the fixture position and rotation in the Stage View.
- If your fixture positions are accurate made in the Stage View and you do not want to lose them, then you can use the Follow to use the XYZ parameters.
- To fade fixture positions on the stage in a straight line between point A and B you need the XYZ parameters.
- Do not unblock sequences containing a mixture of XYZ and Pan/Tilt position data and do not "store /remove" or remove values to remove single attributes of the position preset type of cues when using XYZ. This could result in unexpected loss of position data inside your sequence.