
Stage View
The Stage View is a virtual 3D space where you can position your fixtures and stage elements.
It is a view you can create using the Create Basic Window pop-up.
It could look like this:
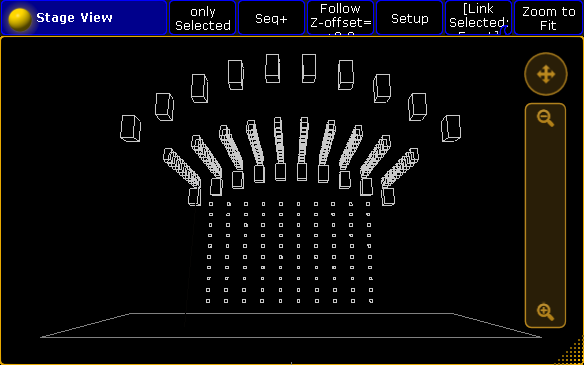
The default is that there is a stage floor. Each fixture you add are represented by a wireframe square. The size is taken from the Fixture Type definition.
New fixtures are positioned at the 0,0,0 XYZ location. You can move your fixtures position to match your real world positions. To learn more about positioning the fixtures please read the Position fixtures in the 3D stage topic.
Moving around in the Stage View
You can freely move around in the virtual 3D space. What you are moving is actually a virtual camera. The cameras are described in more details in the Virtual 3D Cameras topic.
On the right side of the view you can see two controls. There is a circle with cross arrows inside. This can be used to move the camera. press or click inside the circle and move your finger or cursor while pressing. Below the move circle is a zoom bar. Pressing here and moving the finger/cursor up or down will zoom the view.
If you have a mouse with a scroll wheel attached and you scroll inside the Stage view then you will rotate left and right around the center point. On a console you can also use a screen encoder to rotate the view. If you press the encoder while you scroll, then you will rotate up and down.
Often you can have a button in the title bar that is called Mouse Mode. This can be used to control the camera. In the picture above it is the button called "Select". This button has several modes: Select, Move, Orbit, Panning, and Zoom.
Select is used to select fixtures in the view.
When Move is active, then you move the camera around when you click or press inside the stage view and move your finger or mouse around.
With Orbit you can rotate around the point where click or press.
Panning allows you to turn the camera without moving it.
Zoom will zoom in and out.
Remember that you are moving a camera. There are several default cameras that you select. The stage view can show you the stage from a specific camera or from the camera that you have selected in the Camera Pool.
In the title bar of the stage view, you might see the camera swipe button. In the picture above it is the button called [Link Selected]. If you swipe it, then it might give you the following options:
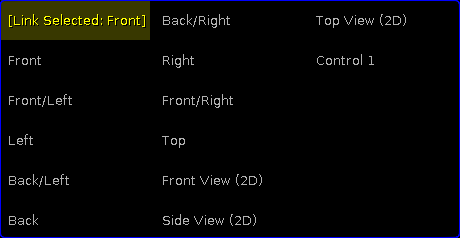
Here you wiil see a list of all available camera. The one you select here is the one you are moving.There is the special option here called [Link Selected]. This will always use the camera you have selected in the Camera Pool.
A connected MA 3D logged in as the same user as you, will use the same list of cameras and there location. This means that if you have the same camera selected in both your 3D and the stage view, then you can move the view in MA 3D.
Tapping the Zoom to Fit button will reset the camera position.
If you tap the space bar on your keyboard, then you will step through the different cameras.
If your Stage view is completely empty even though you have patched some fixtures. Then you might want to check if you have any cameras. Without cameras, then the stage view cannot show you the stage.
Stage View Options
You can open the Stage view options by tapping the yellow ball in the upper left corner.
There are four taps in the options.
The first one is called Calibration. This has one button. Tapping this will open the auto-calibration of moving light position. This has its own topic - please read about it here Autocalibrate fixture positions.
The next tap is about the Follow function. Here you can set the follow height. Please read more about the follow function below.
Next tap is the Mask function. Here you can set up a mask for the view. You can create a mask that hides fixtures based on a set of four rules. Read more about masks in the What are masks topic.
The right most tap is Title Buttons. There are quite a few buttons that you can have in the title bar. The following is short description of them:
- Zoom to Fit:
Pressing this button will reset to position of the selected camera. - Camera:
This is the swipe button that allows you to select a camera. - Setup:
This button is used to enter the Stage Setup mode. Here you can change the arrangement and position of fixtures. - Follow:
This button will activate the Follow function. It also displays the "Z-offset". Read more about the follow function below. - Mouse Mode:
This button is used to control what happens if you click/press inside the stage view and move the cursor. Please read the Moving around the stage view above. - Prog Only, Active Only, Parked, Seq+, Seq-, Only Selected, Mask 7, Mask 8, Mask 9, Mask 10:
These buttons are actually different mask buttons. The first six are the default mask. The last four are mask buttons that you can define. For more about the masks please read the What are masks topic. - Enable Mask:
This button will enable or disable the mask function in the Stage view. For more about the masks please read the What are masks topic. - Follow Mask:
This button will make the Stage view use the selected mask (In the Mask Pool). For more about the masks please read the What are masks topic.
Follow function in Stage view
The follow function is a very nice way to point your moving lights at a location in your 3D space and then in your real world.
The idea is that you position your fixtures in the 3D space at the same location as they have in the real world. Then you select the fixtures you want to use, activate the Follow function and tap or click on your 3D stage where you want the fixtures to point. And then the real fixtures will point at that location.
In the options (see above) or by pressing the Edit key and then the Follow button in the title bar, you can set a Z-offset. This is the height of the point.
The Follow function overwrite all other Mouse Modes.