
Virtual 3D Cameras
In the Stage View topic we looked at the virtual 3D stage. It was mentioned that we are actually looking at the stage through virtual cameras.
If there was no cameras then you cannot see the stage.
The cameras are located in the Camera Pool. You can create a camera pool on your screens using the Create Basic Window pop-up. It is described in the Manages windows topic.
It is a pool. To learn general thing about the pools please read the Pools in General section.
The Camera pool could look like this:
If you change the pool to be in sheet style (in the pool options) it could look like this:
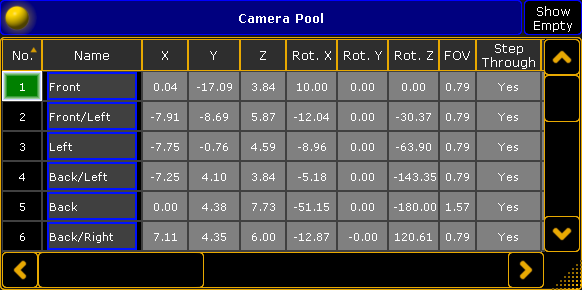
Each of the cameras in your show file is represented by a pool object.
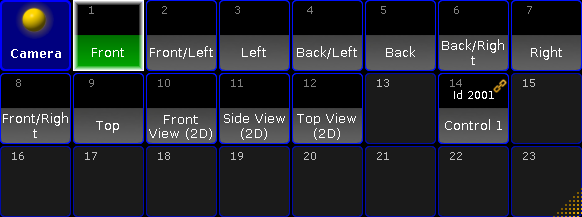
There is always a selected camera. It is the one that have the green background color behind the name when in pool view and green background on the number when in sheet mode. Stage view and MA 3D can reference the selected camera. This means that you can change what camera you are looking through for many screens simply by tapping or clicking a different camera in this pool.
Cameras controlled by a fixture
A camera can be linked to a special MA camera controller fixture.
You will need to add this camera controller fixture to your fixture setup - read about it in the Adding fixtures to your show topic. When you have the fixture then you can link the camera with the controller fixture.
When a camera is linked, then you can see the link icon in the upper right corner of the camera pool button and in the top half you will see the Fixture ID of the controller. When a camera is linked, then you cannot control it manually.
You can use the same camera controller to control more than one camera. Then you can use the camera position values (read more below) to create an offset between the different cameras.
Read below to learn how to link the two objects.
Editing a camera
If you edit (right-click with mouse or press Edit followed by the object) a camera pool object, then you get the a window with all the options for a camera. It could look like this:
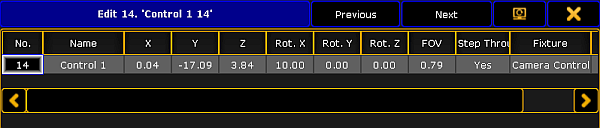
Here you can see the different settings for the camera.
In the title bar you will find two buttons that allows you fast access to the previous and next camera. There is also the button to move the editor to a different screen and the close editor X.
Each cameras settings are displayed as a sheet with columns. The following is a description of each column:
- No.:
This is the camera number. You cannot edit this value, but you can of course move the camera in the pool. - Name:
This is the name of the camera. - X, Y, Z:
These three columns is the position of the camera in the 3D space. - Rot. X, Rot. Y, Rot. Z:
These three columns are the rotation of the camera. - FOV:
This is the cameras field of view. - Step Through:
Turning off Step Through will exclude this camera from the cameras you can step through in the stage view and MA 3D by pressing the space bar. - Fixture:
This is where you can assign a camera controller fixture to the camera. Editing this cell will open the small Select Camera Fixture Controller pop-up. It lists the available controller fixtures. It could look like this: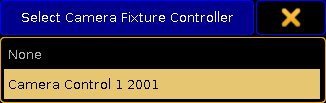
Select Camera Fixture Controller pop-up
- Info:
Here you can write any information you like.