
DMX and Parameter lists
In this topic we are going to have a look at two list that is available from the Live Setup menu.
You can open these list by pressing the Setup key and then tap Patch Only (Live).
DMX List
When you are in the Live Setup, then you can see a button on the right side called DMX List. If your menu is on screen 1 then you can press the U4 key or you can simply tap the DMX List button on the screen - even when the menu is on other screens.
This is what it could look like:
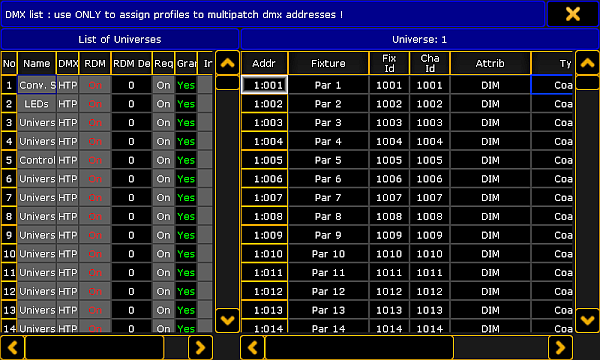
The DMX List is separated into two sides.
The left side lists all the universes and the property for each universe.
The right side displays all the DMX addresses in the, on the left side, selected universe. You can see what is patched to each address and you can assign a DMX profile to the DMX address. It only displays information for you. You cannot change anything except the DMX profile. Editing the DMX Profile cells will give you a small select pop-up with all the available DMX Profiles. Read more about DMX profiles following this link.
The left side has a lot of columns and many of them can be edited - everything with a gray background can be changed. The following is a short description of each column on the left side:
Number:
This is the universe number. You cannot change this value.
Name:
This is the name of the DMX universe. Here you can write a name that makes it easy for you to identify what the universe is used for.
DMX In Merge:
Editing cells in this column gives you the following small select pop-up:
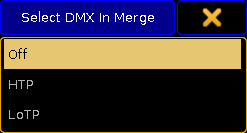
Here you have three options: Off, HTP, and LoTP.
- Off - means that any incoming DMX is not merged into the universe.
- HTP - is the default. HTP means that incoming DMX is merged with the DMX from the console and the highest DMX value is sent to the output.
- LoTP - means that incoming DMX is merged with the DMX from the console and the lowest DMX value is sent to the output.
RDM:
Here you can turn RDM functionality On or Off for the DMX universe. Read more about RDM here.
RDM Devices:
This is the number of RDM devices discovered in the DMX universe.
Requested:
Here you can see what universes you have requested to control. You can turn On or Off (the cell is empty if it is Off) the output of the universe.
Granted:
Here you can see if the universe is granted. A universe can end up not being granted if you do not have enough parameters. The console will grant parameters to as many universes as possible starting with number 1. If you do not request a universe then it will not be granted.
Info:
Here you can write an info about the universe.
The changes you make here are made immediately.
That was the DMX List.
Parameter List
When you are in the Live Setup, then you can see a button on the bottom called Parameter List. If your menu is on screen 1 then you might be able to press the X16 key or you can simply tap the Parameter List button on the screen - even when the menu is on other screens.
This is what it could look like:
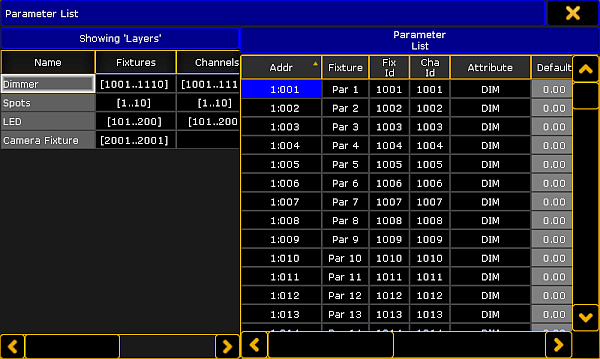
Again a list that is divided into two sides. The left side displays the layers in your fixture schedule. The right side displays all the parameters in the (on the left side) selected layer.
On the left side you can only change the name and information text to each layer.
The right side has a lot more columns that you can edit. What you are editing here is connected to the parameter and follows it. So you can re-patch the fixture and the settings will follow. The columns can be sorted. So you can sort the list by ID number, name, address, attribute, and so on. The sorting can be both ascending and descending order.
Next is a short description of each editable column.
- Default:
This is the default value for the parameter. - Highlight:
This is the value that the parameter will get when you have activated the Highlight function. Many parameters (other than Dimmer) have a "None" value here. This means that the parameter will not be overwritten by the Highlight function. - Stage:
The Stage value is used when you are in the Auto-calibration of fixture position mode. This is typically not defined (None value). - Snap:
Here you can activate the Snap function for the parameter. Snap means that you cannot fade between values. The parameter will change to the new value defined by the "Snap Percent" in each cue. - Invert:
Here you can invert the DMX output for the parameter. - MIB disable:
Here you can turn off the MIB (Move In Black) functionality for the parameters. This might be a good idea for some scrollers. You set On, to disable MIB. - Profile:
Here you can assign a DMX profile for the parameter. Editing the cell will open the Small Select DMX Profile pop-up. It will list all available DMX profiles. Read more about DMX profiles following this link.
The changes you make here are executed immediately.
You can change the same things by editing the fixture (Edit Fixture X).