
Patch and Fixture Schedule Window
The Patch and Fixture Schedule Window is located in the Setup, column Show, tap Patch & Fixture Schedule.
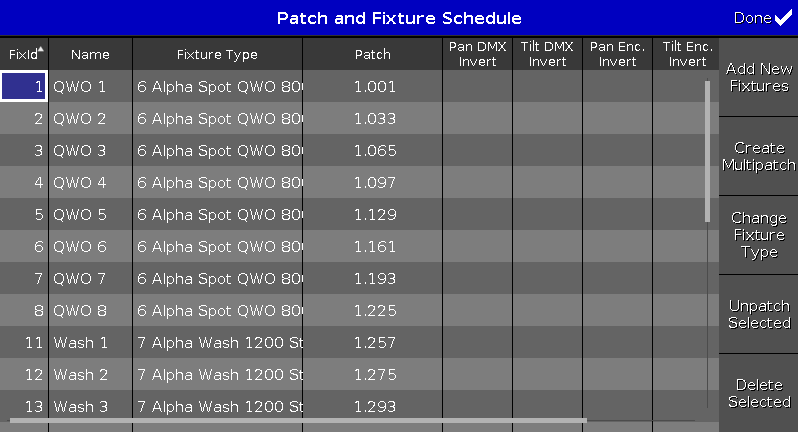
In this view, you have an overview about all imported fixtures in the show file.
You can also invert DMX values and encoders.
A selected fixtures has a blue background and a white frame around.
To confirm the settings tap Done  in the title bar.
It opens the Leaving Patch & Fixture Schedule... Window.
Columns in the Schedule
The schedule has nine columns.

FixId:
Displays the fixture Id. This column has a sort function.
To edit the fixture Id, press and hold the cell or press the scroll encoder. The Select Fixture ID(s) Window opens.
Name:
Displays the fixture name. This column has a sort function.
To edit the name, press and hold the cell or press the scroll encoder. The Edit Name Window opens.
Fixture Type:
Displays the fixture type inclusive the fixture type number at the beginning and the mode.
This column has a sort function.
To edit the fixture type, tap at Change Fixture Type, or press and hold the cell, or press the scroll encoder. The Select Fixture Type... Window opens.
Patch:
Displays the patch address (DMX address). If a fixture has no patch it is displayed as a dash in brackets.
To edit the patch address, press and hold the cell or press the scroll encoder. The Select DMX Address... Window opens.
Pan DMX Invert:
Displays if pan DMX invert is on or off (= nothing is displayed).
To change the status, press and hold the cell or press the scroll encoder.
Tilt DMX Invert:
Displays if tilt DMX invert is on or off (= nothing is displayed).
To change the status, press and hold the cell or press the scroll encoder.
Pan Enc. (=Encoder) Invert:
Display if pan encoder invert is on or off (= nothing is displayed).
To change the status, press and hold the cell or press the scroll encoder.
Tilt Enc. Invert:
Display if tilt encoder invert is on or off (= nothing is displayed).
To change the status, press and hold the cell or press the scroll encoder.
Visualization Color:
The visualization color, helps to display the actual color of the light in the dot2 3D or the Fixtures View, e.g. for dimmer using a gel.
To change the visualization color, press and hold the cell or press the scroll encoder. The Edit Visualization color window opens.
The Edit Visualization window is basically the same as the Color Preset Type view.
React to Master:
As default React to Master is always enabled.
Whenever it is enabled, the dimmer attributes of fixtures are affected by the Grand Master and Solo. If React to Master is disabled, the intensity will not be affected by these.
The fixtures turn olive green in the Fixture Schedule. For more information see System Colors – Background.
Buttons in the Schedule
Rightmost of the window are five buttons.

Add New Fixture Window:
Tap to open the Add New Fixtures Window.
Create Multipatch:
Tap to open the Calculator. Enter the amount of multipatch fixtures.
Multipatch create additional row to patch several DMX addresses for the selected fixture in the Patch and Fixture Schedule. It is used to control several DMX addresses by using one fixture ID in the console. The multipatch fixtures are doing all the same, indicated by the same fixture ID. The multipatched fixtures are visualized in the dot2 3D. For more information see dot2 3D - 3D objects.
Change Fixture Type:
Tap to change the selected fixture type. The Select Fixture Type... Window opens.
Changing fixture types to fixture types that have more DMX channels does not delete the old patch, instead it displays the invalid patch addresses in red. For more information see Add, patch, change, and delete fixtures.
Unpatch Selected:
Tap to unpatch the selected fixtures.
Delete Selected:
Tap to delete the selected fixture from the Patch & Fixture Schedule.
Encoder Bar Functions

Scroll:
To scroll up or down, turn the encoder left or right.
To scroll left or right, press and turn the encoder left or right.
To edit a selected cell, press the encoder. The respective window opens.
Select:
To select fixture types, press the  key and turn the encoder left or right.
To cancel a selection of fixture types, press the  key and press the encoder.