
Remote Inputs Configuration Window
The Remote Inputs Configuration Window is located in the Setup, column Show, Remote Inputs.
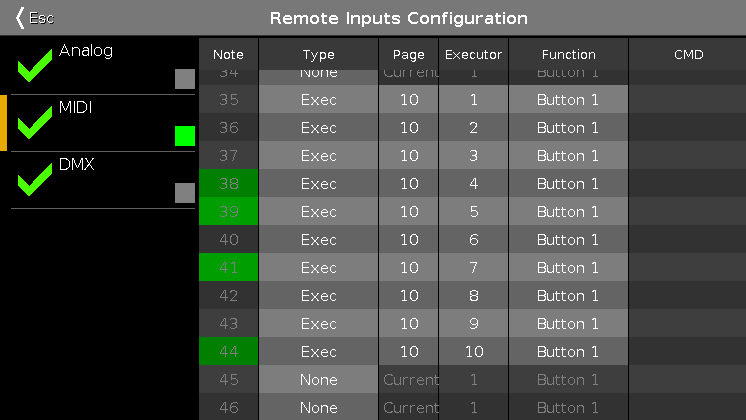
In this window, you can set what the dot2 should do with the connected remote inputs.
On the left side of the screen are the three different remote inputs displayed:
- Analog
- MIDI
- DMX
The green tick displays, that this type of remote control is enabled.
The red prohibition sign displays, that this type of remote control is disabled.
To enable or disable a type of remote control, press the Input Type encoder.
The selected remote input has an orange bar on the left side of the cell.
If an input activity is receiving, it is displayed by a green indicator.
For all remote control inputs are the following four columns available:
Type:
Displays the type of action what the console should do when the contact is activated.
To select the type, press and hold the cell or select the cell and press the scroll encoder. The Select Type Window opens.
Page:
Displays the selected page.
To change the page, press and hold the cell or select the cell and press the scroll encoder. The Calculator opens.
Executor (only if the selected type is executor):
Displays the assigned executor number from the selected page to the input.
To see the executor numbers in the executor bar, press and hold the
 key.
key.To select an executor, press and hold the cell or select the cell and press the scroll encoder. The Calculator opens.
If you typed in an invalid executor number, the executor cell is displayed with a red background.
Function (only if the selected type is executor):
Displays the assigned button or fader.
To select a button or fader, press and hold the cell or select the cell and press the scroll encoder. The Select Function Window opens.
CMD (= command, only if the selected type is CMD):
Displays the assigned command to the input.
To type in a command, press and hold the cell or select the cell and press the scroll encoder. The virtual keyboard opens. Enter the command which should be executed.
Analog
For using the analog remote you have to connect e.g. a light barrier or a push button, on the DC Remote Control at the back of the console.
Refer to, physical setup and layout.
Additional to the four standard columns, the analog remote control has the Input column.
Input:
Displays the input in from the connected DC Remote Control.
The pin layout is displayed next to the connector on the back of the console.
Pin 1 - 6 = Input 1,3,5,7,9,11
Pin 9 - 14 = Input 2,4,6,8,10,12
There are twelve different inputs available to assign.
This column is read only.
MIDI
For using the MIDI remote, you have to connect a MIDI remote on the MIDI In connector at the back of the console.
Refer to, physical setup and layout.
If you assigned in the column type an executor, and in the column button a fader, the velocity controls the fader level.
Additional to the four standard columns, the MIDI remote control has the Note column.
Note:
Displays the available MIDI notes from 0 - 127.
DMX
To use the DMX remote, connect a DMX remote either to the DMX In connector on the back of the console, or to one of the network protocols – Art-Net input and sACN input.
Refer to physical setup and layout.
Incoming DMX vlaues are displayed in the DMX view in universe 9.
To trigger a button or command by DMX in, a DMX value between 128 and 255 is necessary.
The green indicator is only visible if a DMX value above 0 is sent to trigger faders, or above 127 is sent to trigger buttons or commands.
Additional to the four standard columns, the DMX remote control has the DMX column.
DMX:
Displays the DMX address. This column is read only.
Encoder Bar Functions

Input Type:
To select a remote input type, turn the encoder left or right.
To enable or disable a remote input type, press the encoder. The current status is displayed in brackets.
Scroll:
To scroll up or down, turn the encoder left or right.
To scroll left or right, press and turn the encoder left or right.
To edit a selected cell, press the encoder. The respective window opens.
Select:
To select more than one cell, press the key and turn the encoder up or down.
A blue frame around the cells displays the selected cell.