
Select DMX Address... Window
The Select DMX Address... Window is located at the Setup, tap Patch & Fixture Schedule.
1. For existing fixtures:
press and hold in the column Patch the cell from the fixture you want patch.
2. For new fixtures:
tap Add New Fixtures, tap at the last field Patch the Select button.
The Select DMX Address... Window opens.
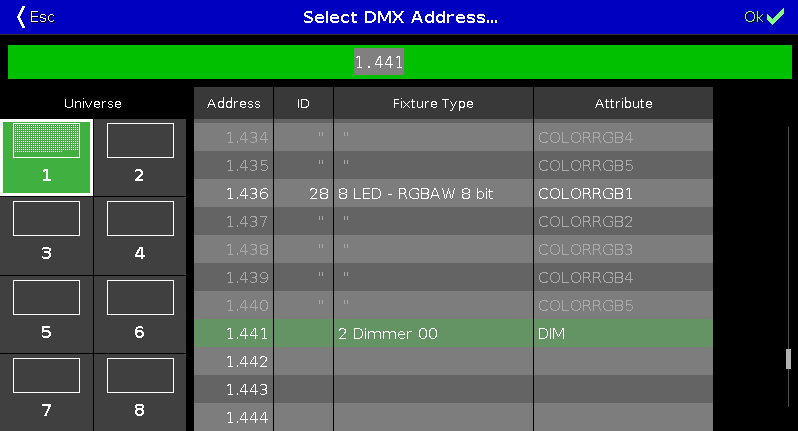 Figure 1: Select DMX Address... Window
In this window, you patch fixtures and select a DMX address.
Below the title bar is the green edit line.
To jump to a DMX address, type the DMX address in the edit line.
The edit line displays also the selected DMX address from the table.
To confirm a selected DMX address, press  in the title bar. The window closes and you are back in the previous window.
To leave the DMX Address Window, press  in the title bar. You are back in the previous window.
Universe Overview
The universe overview is located on the left side of this window.
 Figure 2: Universe Column
The universe column includes eight universes.
A selected universe has a green background and a white frame around.
The white dots inside a universe displays which DMX addresses are assigned.
If there are no dots in a universe, the universe is free.
Universe Table
The universe table is right beside the universe overview.
The table has four columns Address, ID, Fixture Type and Attribute.
Address: Displays the DMX addresses.
ID: Displays the fixture IDs.
Fixture Type: Displays the fixture types.
Attribute: Displays the fixture attributes.
If a fixture needs more than one DMX address, the first column is in a white font and all following are in a gray font.
A selected fixtures which is fitting in the selected DMX address has a green background.
 Figure 3: Universe Table with fitting Fixture
A selected fixtures which is unfitting in the selected DMX address ha a red background.
 Figure 4: Universe Table with unfitting Fixture
Encoder Bar Functions

Universe:
To select an universe in the universe column, turn the encoder left or right.
Test output value:
To set a test output value, turn the encoder left or right.
The DMX value is output directly to the stage. Thus, single DMX channels can be tested before they are patched. The value is automatically reset when leaving the dialog.
Patch Offset:
To select a patch offset, turn the encoder left or right.
For more information about patch offset, refer to Add New Fixtures Window.
Address:
To select an address in the table, turn the encoder left or right.
To confirm the selected address, press the encoder.