Hint:
It is possible to copy pool elements within the layout view:
-Select the pool element you would like to copy in the view.
-Then, press Copy and tap the spot you would like to copy the pool element to.
After you have opened the layout view, enable Setup in the title bar.
Important:
Enabling Setup in the layout view allows editing of single objects. Whereas, disabling Setup allows editing as in the programmer.
The layout view encoder bar appears.
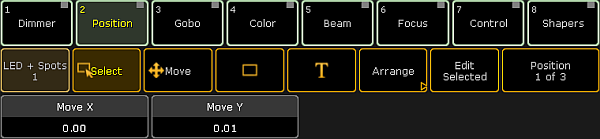
Layout view encoder bar
Select an object in the view.
To toggle between position, size and style, tap Position 1 of 3.
Edit Selected
To edit objects, tap Edit Selected in the encoder bar.
The pop-up Edit Layout Element opens.
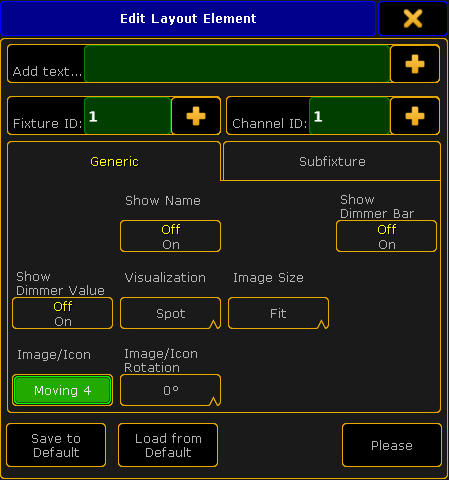
Pop-up Edit Layout Element
To add a name or a number on top of an object, tap on the right of the pop-up, right below the title bar where it says "Add text..." .
-The calculator opens.
-Tap number or name you would like to be displayed on top of an element.
To exchange fixture and channel IDs, tap on the right in the upper section of the pop-up where it says "Fixture ID:" and "Channel ID:".
-The calculator opens.
-Tap the number you would like to exchange.
To see the name in an object, tap Show Name.
To see the dimmer bar in an object, tap Show Dimmer Bar.
To see the value of a dimmer in an object, tap Show Dimmer Value.
To choose between three different displays of color in an object, tap the drop-down button below Visualization.
To change the size of images, tap the drop-down button below Image Size.
To change the image or an icon, tap the button below Image/Icon.
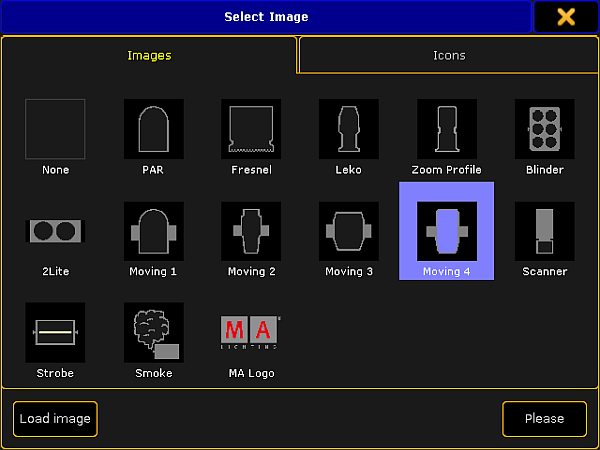
-The pop-up Select Image opens.Pop-up Select Image
-To exchange an image or an icon (tab Icons), tap an image or an icon.
-Then, tap Please.
-To import a new image into the image pool, tap Load image.
The rectangle button in the layout view encoder bar has three different functions:
Group select:
To select a group of objects, tap the rectangle button and tap in the layout view. Then draw the "Lasso".
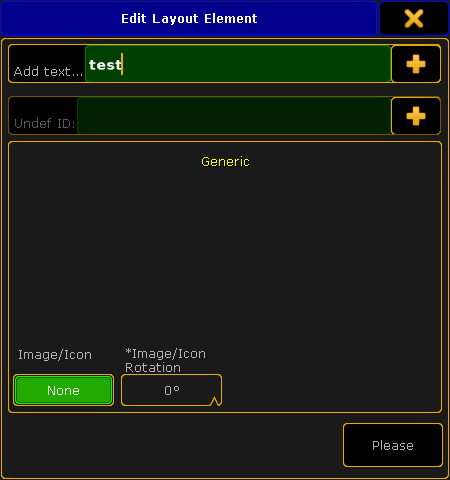
The pop-up Edit Layout Element opens.
Pop-up Edit Layout Element – Rectangle symbol
-To disable group select, tap Group Select.
Bitmap:
To generate the function of a bitmap, tap the rectangle button in the layout view and draw the "Lasso". The pop-up Edit Layout Element opens.
-To apply the bitmap effect, tap the drop-down button Visualization and select a bitmap effect.
Important:
All fixtures that are located within the rectangle generate the bitmap effect. Thus, the rectangle is a canvass here.
Background:
The rectangle symbol can also be used to generate a background.
-Tap the rectangle button in the layout view and then draw the "Lasso". The pop-up Edit Layout Element opens.
-To select an image or an icon as a background, tap the button below Image/Icon and the pop-up Select Image opens.
-You can now select your background.
Move
The button Move moves the screen of the layout view.
To move the entire screen of the layout view, tap the button Move and then tap the layout view.
Now, move your finger and see how the screen displaces.
Select
The button Select selects the objects via "Lasso".
To select the objects, tap Select and then tap in the layout view and move your finger.
Hint:
To select several objects, press and hold Ctrl on the keyboard in the drawer or an external keyboard and tap the objects you would like to add to your selection.
Important:
It is possible to use the Double tap mode here. For more information see Layout view options.
Delete Pool Elements
To delete single objects, press Del and then tap the object you would like to delete in the layout view.


 on the right of the pop-up, right below the title bar where it says "Add text..." .