
VPU - Pixel Mapper Grid View
Via the tab 'Grid View’ you can switch to the Grid View of the Pixel Mapper:
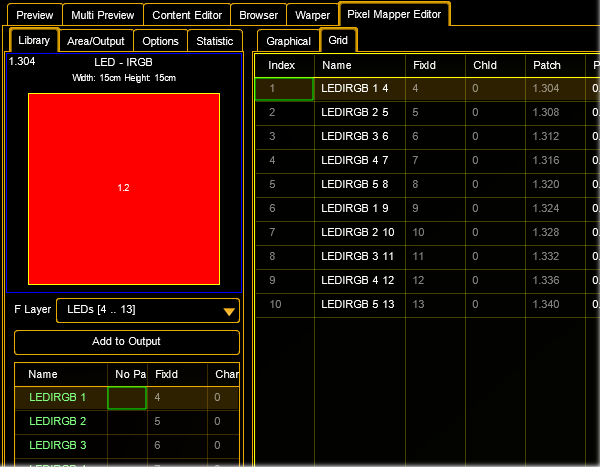
This view offers an overview about all used fixtures of the selected output.
Most values can be edited directly in the grid. Vales which can not be edited are displayed in light grey.
Selected fixtures are displayed with an orange background. Patch collisions are indicated and marked red.
You can use common functions like:
Multiselection: select first row while pressing <Shift> and select last row (still hold <Shift>)--> all rows inbetween are selected.
Select or deselect several rows by pressing Ctrl. Press F2 for editing a value and all selected values will take over the new value.
Selecting multiple values can also be done by using the rubberband, means to lasso a certain area.
The edit control (to type in the value) can be opened by a left mouse click on a selected value.
Holding <Ctrl> while lassoing (selecting) values allows toggling the selection.
The selection of several rows (multiselection) is marked by green frames.
All green highlighted values values of the same column will take over the new value.
Export- Import to Excel: You can Export or Import the panels to an Excel (.csv) file via the context menu
Copy & Paste from an Excel Sheet:
Note: you can only do this on a Media PC or on a external PC running the VPU Software. Only the Name of the fixture, PosX, PosY and Rot can be manipulated.
If you want to use the functionality in combination with a VPU, this external PC has to be in a session with the VPU or the same showfile that you just edited.
It has to be uploaded to the VPU afterwards. Create an Excel sheet or Tab separated .txt file that fits the options in the VPU change all cells to the desired values:
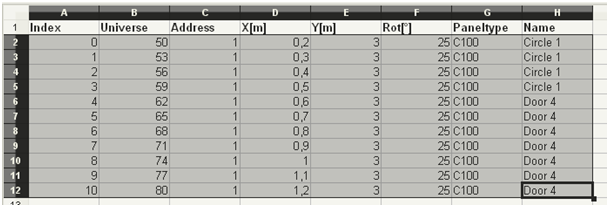
Copy these settings to the clipboard by pressing CTRL + C (only values shall be selected, not the headline, numerical values comma or Tab separated, so e.g. only values like “2,3” are valid.
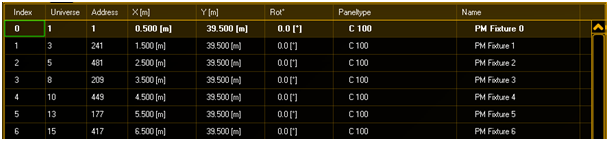
Open the VPU software; go to the grid view in the pixel mapper mode.
Select the row, where you want to insert new values:
Right click into the grid view and select “Paste”. The result looks like this:
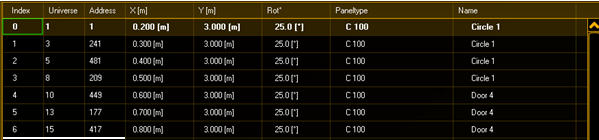
You can change Name, PosX, PosY und Rot of the panel. If you select e.g. only PosX in the Excel Sheet (and copy that into the clipboard), then set the marker in the cell from where you want to change the values and you paste this information into the VPU software, only these values will be overwritten. So selected copy paste is possible as well.
If no real keyboard is connected you can use the on screen keyboard to enter values into the grid.
Therefore do a right mouse click into the grid.