
Match RDM devices
After RDM (= Remote Device Management Protocol) is turned on the grandMA2 starts to discover RDM devices. The discovered RDM devices are displayed in the RDM devices window. On the left hand side there are the fixture types, on the right hand side the fixtures.
When working with parameters only you can skip the match RDM devices topic and continue with the topic work with RDM parameters.
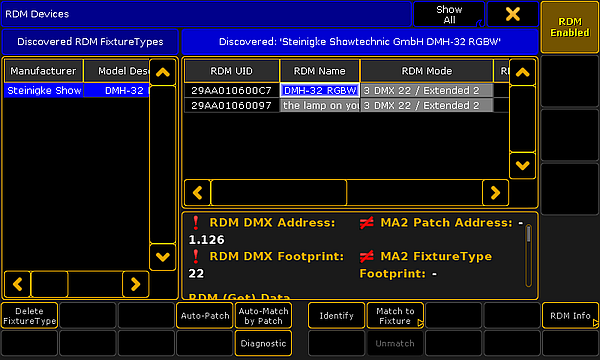
To work with sensors or notifications the RDM devices have to match to the patch. That means you have to select which fixture of the patch belongs to which RDM fixture. Footprint and DMX address have to be the same.
There are two ways to match RDM devices:
Match to fixture manually
The match to fixture manually is the preferred way when you are not sure if the MA Fixture and RDM Fixture have the same DMX address and the same DMX footprint. If you already double-checked the DMX address and the DMX footprint use the auto-match by patch function.
Requirement: RDM is turned on.
- To open the RDM devices window press Setup and tap under Show at Patch & Fixture Schedule.
The Edit Setup opens. - Tap in the lower right corner at RDM devices.
The RDM devices window opens. - To select the fixture type you like to match tap at the corresponding fixture type under Discovered RDM FixtureTypes.
The fixtures of the selected fixture type are displayed on the right side of the RDM devices window. - To select the fixture tap at the fixture in the table on the right screen side.
- If you want to identify this fixture in the lighting-rig tap at Identify.
The identify mode of the selected fixture starts. For more information about the identify mode see the fixtures manual. - If you have the to be matched fixture selected in the table tap at Match to Fixture.
The Match to MA Fixture pop-up opens. This pop-up displays all fixtures in your patch.
For a better overview you can:
- Search in the green search field for fixture or channel ID.
- Select in the title bar one of the patched layers.
- Choose in the title bar if you want to see All fixtures, Unmatched fixtures or Current FixtureType only.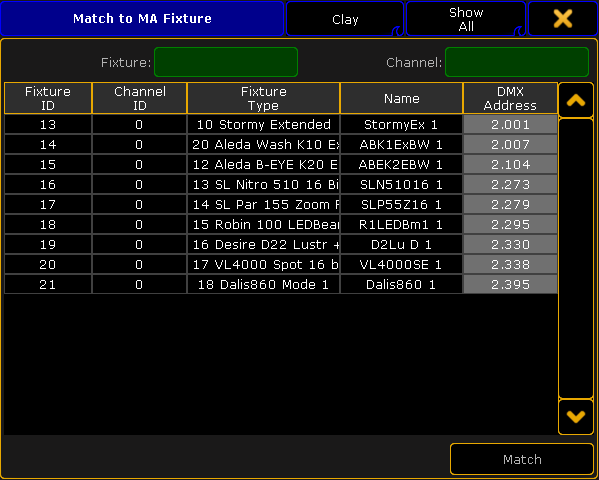
Match to MA fixture pop-up - Tap in the table at the fixture you like to match and tap Match.
RDM universe and DMX universe has to be the same. If they are not the same, double-check the network configuration under Setup -> Network -> MA Network Configuration and / or the DMX wiring.
The patch of the selected fixtures matches to the RDM device. A successful match is indicated by green check marks in the field below the fixture table.
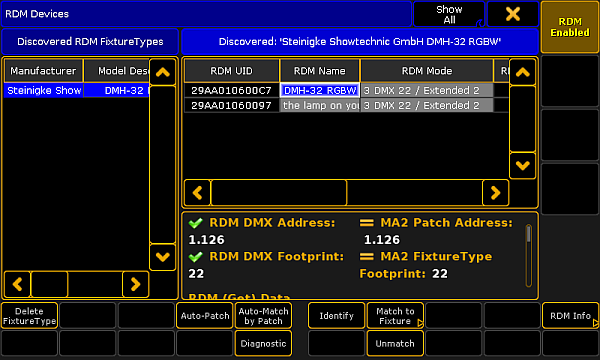
The fixtures are matched.
Auto-Match by Patch
Make sure that the MA Fixture and RDM Fixture have the same DMX address and the same DMX footprint. If they are not the same match the fixture manually.
The auto-match by patch is a fast way to match fixtures.
- To open the RDM devices window press Setup and tap under Show at Patch & Fixture Schedule.
The Edit Setup opens. - Tap in the lower right corner at RDM devices.
The RDM devices window opens. - To select the fixture type you like to match tap under Discovered RDM FixtureTypes at the fixture type.
The fixtures to the selected fixture type are displayed on the right side of the RDM devices window. - To select the fixture tap at the fixture in the table on the right screen side.
- If you want to identify this fixture in the lighting-rig tap at Identify.
The identify mode of the selected fixture starts. For more information about the identify mode see the fixtures manual. - Tap Auto-Match by Patch.
The software checks if there is a matched MA fixture with the same DMX address and DMX footprint available. If a matched fixture is found the auto-match is successful. A successful match is indicated by green check marks in the field below the fixture table.
You can also use the keyword RdmAutomatch to auto-match RDM devices by using the command line.