
Version 3.9
Work with RDM parameters
After the RDM is turned on and an RDM fixture is discovered, you can:
- Send RDM commands to the RDM fixture see Set RDM parameter
- Add RDM parameter used by the fixture see Add RDM parameter
- Delete previous added parameters see Delete RDM parameter
Set RDM parameters
The following examples will explain the set parameter function with the example of changing the fixture mode.
There are two ways to set RDM parameter.
Requirement: RDM is turned on and at least one RDM fixture is discovered.
Way A:
- Open the RDM sheet. Tap on an empty space in the user defined area, tap at Sheets and then at RDM.
- The RDM sheet opens.
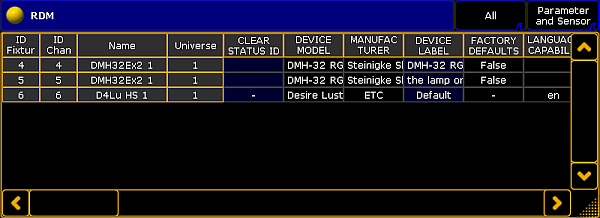
RDM sheet - Scroll with the scroll bar to the column DMX PERSONALITY and tap at the cell you like to change the fixture mode. Press the screen encoder.
- The Select RDM Mode pop-up opens.
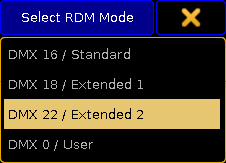
Select RDM Mode pop-up - Tap at the mode the fixture should use.
A new mode is set and transmitted via RDM to the RDM fixture.
Way B:
- Open the RDM devices window. Press Setup, and tap under Show at Patch & Fixture Schedule.
The Edit Setup opens. - Tap in the lower right corner at RDM devices.
The RDM devices window opens. In this window, you can set the parameter of the DMX personality and the DMX start address of the RDM fixture.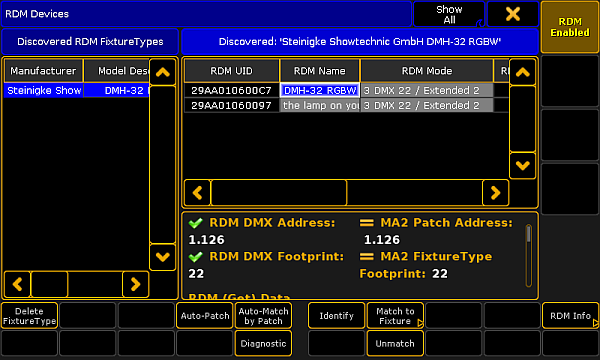
RDM devices window - To select the fixture type you like set parameters to, tap at under Discovered RDM FixtureTypes at the fixture type.
The fixtures to the selected fixture type are displayed on the right side of the RDM devices window. - To select the fixture, tap at the fixture in the table on the right screen side.
- Tap in the lower right corner at RDM Info.
The RDM Parameters window opens. In the title bar, you can choose between Show only Set, Show only Get, Show All, and FixtureType Messages.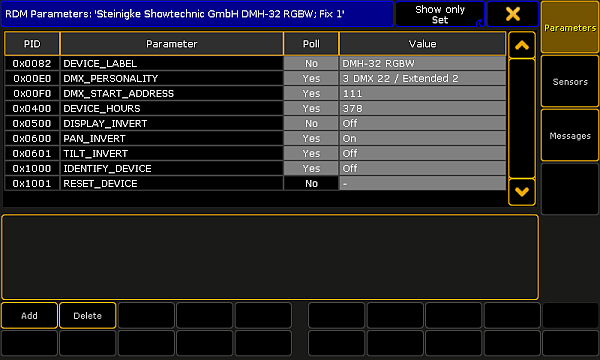
RDM Parameters window - Tap and hold the value cell in the row DMX_PERSONALITY.
The Select RDM Mode pop-up opens.
Select RDM Mode pop-up - Tap at the mode the fixture should use.
- Double-check if Yes is set in the cell of the column Poll.
Yes means, that the information is collected from the fixture. If Poll is set to No, you can change the parameter but the changes are not visible in the console.
If No is set, tap and hold in the cell until Yes is set.
A new mode is set and transmitted via RDM to the RDM fixture.
Add RDM parameter
If the fixture uses RDM parameters but those parameters are not transmitted, you can add RDM parameter.
- Open the RDM devices window.
- Press Setup, and tap under Show at Patch & Fixture Schedule.
- Tap in the lower right corner at RDM devices. - To select the fixture type you like to add parameters to, tap at under Discovered RDM FixtureTypes at the fixture type.
The fixtures to the selected fixture type are displayed on the right side of the RDM devices window. - To select the fixture, tap at the fixture in the table on the right screen side.
- Tap in the lower right corner at RDM Info.
The RDM Parameters window opens. - Tap Add.
The calculator opens.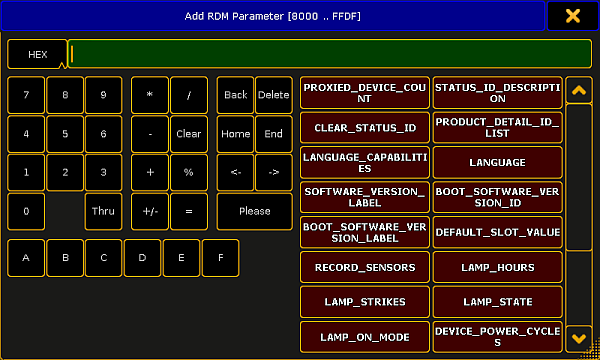
Calculator - Add RDM parameter - Enter the hex value or tap at one of the standard RDM parameters.
The RDM parameter is added and visible in the RDM parameters window.
Delete RDM parameter
Important:
The delete RDM parameters functions is not oopsable.
The delete RDM parameters functions is not oopsable.
You can delete previous added RDM parameters.
- Open the RDM devices window.
- Press Setup, and tap under Show at Patch & Fixture Schedule.
- Tap in the lower right corner at RDM devices. - To select the fixture type you like to delete parameters from, tap at under Discovered RDM FixtureTypes at the fixture type.
The fixtures to the selected fixture type are displayed on the right side of the RDM devices window. - To select the fixture, tap at the fixture in the table on the right screen side.
- Tap in the lower right corner at RDM Info.
The RDM Parameters window opens. - Tap at the to be deleted parameter.
- Tap Delete.
The parameter is deleted.